Contents:
Failed to Play Test Tone Overview
Why Does Failed to Play Test Tone Occur to Windows 10?
How to Fix Windows 10 Play Test Tone Failed?
Failed to Play Test Tone Overview:
Sometimes, when your PC has no sound or happens to crack sound, you may tend to go to Sound Properties and then manage to play test tone on Windows 10. But unluckily, headphones or speakers failed to play test tone for you.
Once Windows 10 fails to play test tone, you will soon encounter various sound issues as failed to play test tone means that the audio device comes across errors and can’t work on Windows 10. You need to fix the audio error as soon as possible.
Why Does Failed to Play Test Tone Occur to Windows 10?
When audio devices failed to play test tone on Windows 10, actually, it is different to ascertain what gives rise to it. You can only troubleshoot it from the audio service, audio driver, audio settings to the system itself.
For example, if the audio service is carelessly stopped, it is a thing of course that you will fail to play test tone on Windows 10. Or if the audio driver is missing, corrupted, or faulty, speakers failed to play test tone will show up.
How to Fix Windows 10 Play Test Tone Failed?
All things related to the audio device should be troubleshot, so take time and patience to fix this failed to play test tone after Windows 10 update. But it is worth a shot to just reboot Windows 10 as many users reported sometimes restarting the computer may simply fix the play test tone failed issue.
Solutions:
- 1: Restart Windows Audio Service
- 2: Uninstall the Audio Driver
- 3. Reinstall a High Definition Audio Driver
- 4: Update the Audio Driver
- 5: Run System File Checker
- 6: Disable All Audio Enhancements
- 7: Change Audio Format
- 8: Uninstall the Antivirus Software
- 9: Add Local Service to Local Group
- 10: Use an External Display
- 11: Fix Windows 7 Failed to Play Test Tone
Solution 1: Restart Windows Audio Service
To begin with, you would better restart the Windows audio service for your speakers or USB headphones, which can resolve failed to play test tone for many of you.
1. Press Windows + R to elevate the Run box and then enter services.msc in the box. Then click OK to get into it.
2. Then in Services window, pinpoint Windows audio and right click it to Restart it.
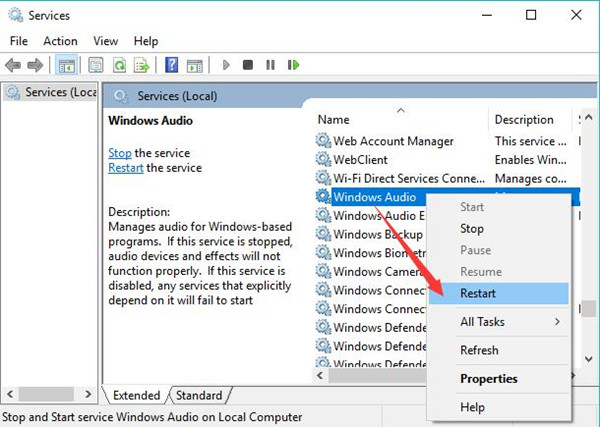
Immediately when the Windows Audio service is re-launched, you can play test tone for headphone or speaker smoothly.
Solution 2: Uninstall the Audio Driver
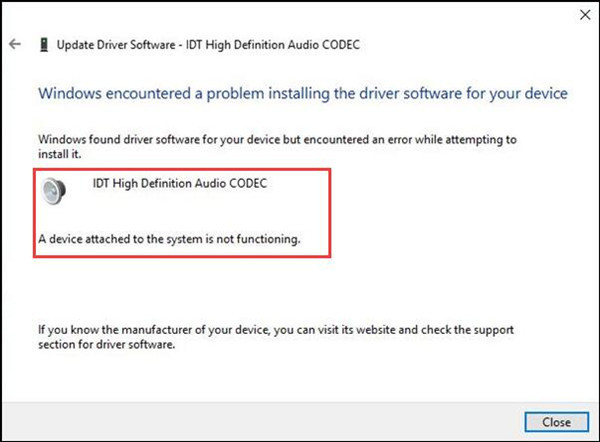
The audio driver can also cause the sound test to fail on Windows 7, 8, 10, so you might as well determine to remove the problematic audio driver and then reinstall a high definition audio driver for your PC.
1. Open Device Manager.
2. Expand Sound, video and game controllers and then right-click the audio driver to Uninstall device.
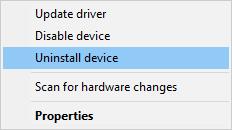
3. Then confirm to uninstall the audio device driver from Windows 10.
Don’t reboot Windows 10, and just move on to reinstall or update the driver for the audio device until it can fix the sound testing issue.
Solution 3: Reinstall a High Definition Audio Driver
In some cases, the high definition audio driver can better suit Windows 10, so it failed to play test tone, you can try to manually install a high definition audio driver.
1. In Device Manager, expand Sound, video and game controllers and then right click the audio driver to Update driver.
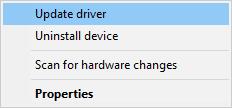
2. Select Browse my computer for driver software > Let me pick from a list of available drivers on my computer.
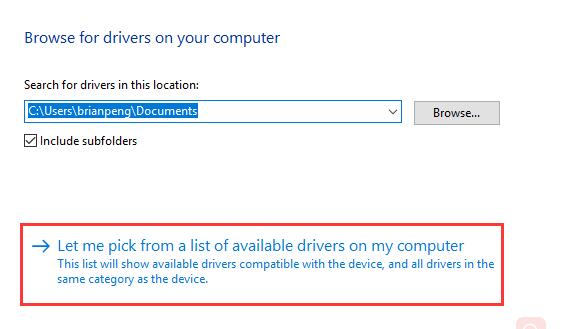
3. In the following window, choose the High Definition Audio Device.
4. In the pop-up window asking for permission, hit Yes to get a High definition audio driver on your PC.
With the HD audio driver, speakers and headphones won’t fail to play test on Windows 10 and you can do a laptop or Desktop sound test.
Solution 4: Update the Audio Driver
Even if the high definition driver is incapable of enabling you to fix the sound error and play sound test, under this circumstance, you may as well turn to Driver Booster or the audio device official site to download the latest audio driver for Windows 10.
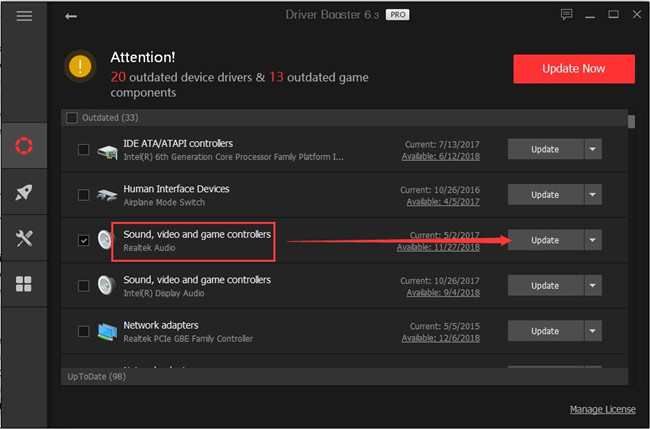
If you have limited time, Driver Booster is a good helper to scan and update the audio driver automatically for you without much of your operation.
1. Download, install and run Driver Booster on Windows 10.
2. Click Scan on the interface to enable Driver Booster to scan for the missing, outdated, or corrupted audio drivers, such as the outdated Realtek High Definition audio driver.

3. Then locate Sound, video and game controllers and Update the audio driver.
If there is more than an audio driver, choose to update them all. Or you can navigate to the official site of the audio device or the PC to download and install the latest audio driver on your own.
Hope the up-to-date audio driver can address Windows headphones play test tone failed issue.
Solution 5: Run System File Checker
Possibly, the time there are any corrupted system files on Windows 10 related to sound, failed to play test tone on Windows 10 will happen to you. Hence, it is of great necessity to run System File Checker (SFC) to detect and correct system files on your PC.
1. Type in Command Prompt in the search box and then right click the best-matched result to Run as administrator.
2. In CMD command-line, input sfc/scannow and then press Enter keyboard key to perform SFC.
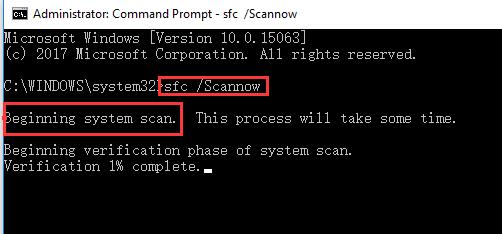
Then you can observe SFC begins to scan for system files and it will also correct these files if possible. In this way, you can fix audio failed to play test tone on Windows 10.
Solution 6: Disable All Audio Enhancements
Besides audio enhancements, some audio settings are also to blame, among which, the audio enhancement is the first thing you need to check. Tough audio enhancements can improve the sound performance, it can also result in play test failed or any other sound issues on Windows 10, so you are supposed to disable all enhancements for a while. Maybe it can help fix failed to play test tone error on Windows 10.
Now, try to set your speaker or headphone as the default device and then disable sound enhancement for this audio device.
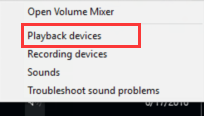
1. Right click the Sound icon and then select Playback devices or Sounds from the list.
2. Then under Playback or Recording, choose to Set default for your speaker or headphone.
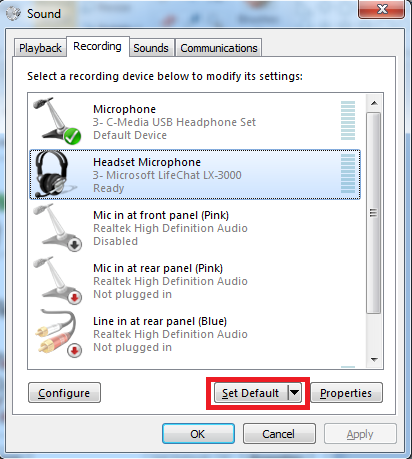
Or here you can also right click the device to Set as Default Device.
3. Then right click the default device to open its Properties.
4. Under the Enhancements tab, tick the box of Disable all enhancements.
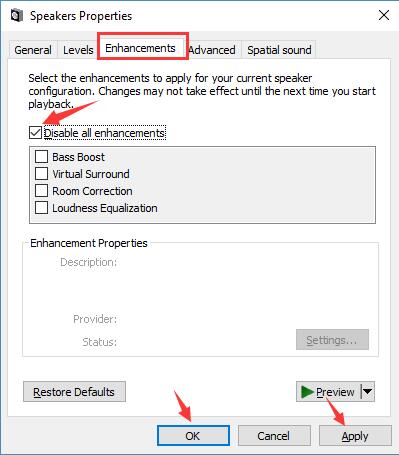
After hitting Apply and OK, try to go back to Sounds windows and right click the audio device to Test. It is likely that this time you won’t come across USB headphones failed to play test tone on Windows 10 anymore.
Solution 7: Change Audio Format
To some degree, the sample rate and bit depth can also affect the audio device, so you would better determine to change to another until you are able to test tones on Windows 10. Here it is suggestible that you try to change to an audio format of lower quality if you are now enjoying it in high quality.
To change the audio format, specifically, sample rate and bit depth, just head to the Properties of the audio device, speaker or microphone. And then under the Advanced tab, under Default Format, change the one you are using to another one in order to fix failed to test sound error.
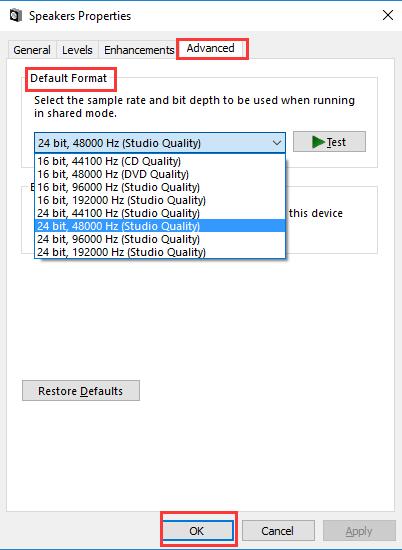
Here, for instance, you can select 16 bit, 48000 Hz (Studio quality).
After that, play a song in Windows 10 and then test it to see if it can work as normal.
Solution 8: Uninstall the Antivirus Software
From user complaints, it is said that the third-party antivirus applications, like Avast, can prevent you from playing test tone. Therefore, you might as well choose to remove the third-party software just as most of the users do to fix speaker, microphone, or headset failed to play test tone on Windows 10.
1. Open Control Panel.
2. Choose to View by Category and then find out Programs > Uninstall a program.
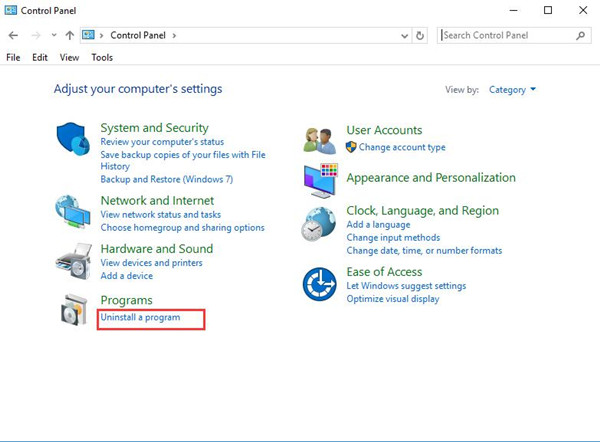
3. Then you will get to Programs and Features window, locate the third-party application and right click it to Uninstall it.
Without the interruption of the antivirus software, you can test tones again. Perhaps this time you will not fail to play test tone on Windows 10.
Related: How to Uninstall and Disable Avast on Windows 10
Solution 9: Add Local Service to Local Group
Adding local service has been confirmed to be an effective way to fix test tones failed issue. You can try it as well.
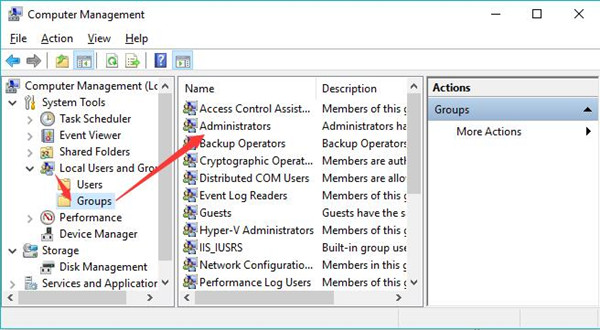
1. Right click This PC and then select Manage from the right-click list.
2. Then in Computer Management, go to Local Users and Groups > Groups > Administrators.
3. Then right click Administrators to Add to Group.
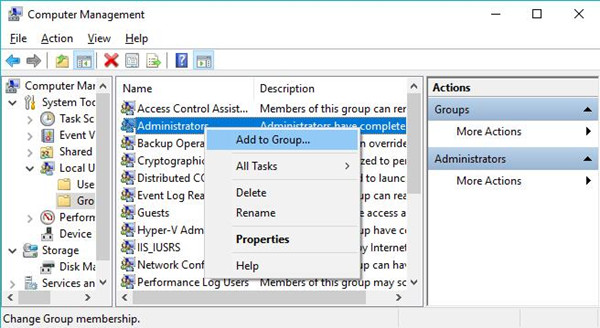
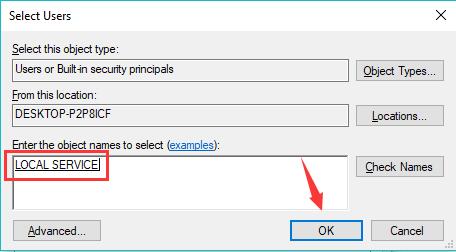
4. In the following separated windows, you need to click Add > Advanced > Find Now.
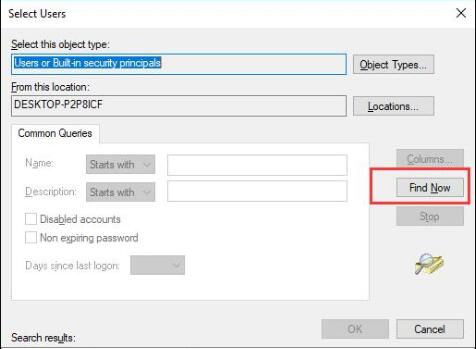
5. Then in the search results, select Local Service.
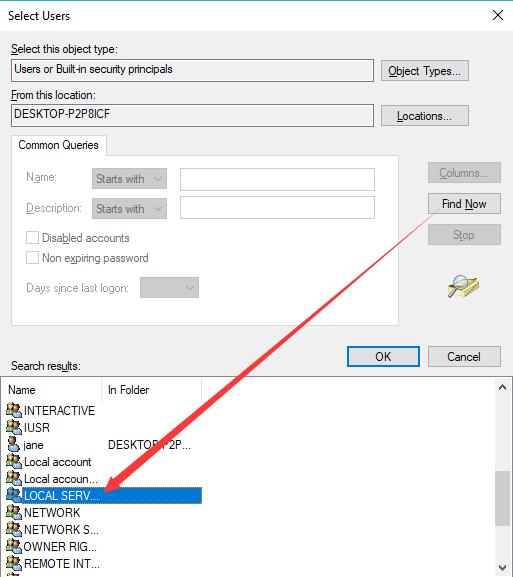
6. As you see, Local Service will have been added. Click OK to accomplish this task.
After closing Computer Management, attempt to play test tone to check whether failed to play test tone error will pop up.
Solution 10: Use an External Display
If Windows 10 failed to play test tone, it means that your PC now is experiencing a sound error on Windows 10. Here it is wise to connect an external display that supports sound, like a TV with HDMI ports and then check the audio error.
1. Connect another external display to Windows 10.
Here you would better connect to a TV with HDMI audio format.
2. Then change the Input source of this display, for instance, the HDML format of the TV.
3. On your PC, navigate to Start > Settings > System > Display.
4. Then decide to Display only on 2.
In this way, another display can be connected to your PC.
5. Right click the Sound icon on the right corner of the Desktop and then choose Playback devices > HDMI.
If all done, your audio device will back to work and play test as well. Or if you are using Desktop, it is worth a shot to plug in a headset if speakers failed to play test tone.
Solution 11: Fix Windows 7 Failed to Play Test Tone
Especially, for clients who failed to play test tone on Windows 7, there is a high probability that you need to get rid of the update package KB974571, which has been proved the culprit that leads to Windows 7 failed to play test tone.
You are advised to uninstall this package from Windows 10 in Control Panel Programs and Features.
Then reboot your PC to take effect. When logging on, go ahead to test tones smoothly.
To conclude, when there are any audio errors, you will fail to play test tone, at that moment, this post will teach you how to fix test tones failed with targeted methods on Windows 10.
More Articles:
Solved: Creative Sound Blaster Not Detected on Windows 10