Are you experiencing the performance issue that the System Idle Process takes up so much CPU in Windows 10 task manager? This post would walk you through this CPU error and tell you how to fix it effectively and completely for Windows 10.
Contents:
- What is System Idle Process in Task Manager?
- Why is the System Idle Process so High in CPU Usage?
- What to do if System Idle Process is High on CPU Usage?
What is System Idle Process in Task Manager?
Idle means doing nothing, when your Windows system process is at 99% or even 100%, it denotes that nothing is using your windows resources.
To be more professional, the System Idle Process contains one or more kernel threads which run on Windows system only when there are no other runnable threads can be scheduled on a CPU, such as Intel or AMD CPU.
At this moment, you may be extremely confused why this System Idle Process makes CPU usage at 100% on Windows 10.
Why is the System Idle Process so High in CPU Usage?
Usually, when the processor in a computer is idle on Windows 10, the System Idle Process would appear in the CPU column and occupy 70 to 90% CPU usage.
Therefore, that is why even in the situation where there are only some routine programs running on Windows 10, the System Idle Process high CPU problem occurs to you without any sign. For the processor for your PC awaits more commands to perform.
But in some cases, this System Idle Process 100 CPU usage is always simultaneous with the high disk usage or memory usage on Windows 10.
Thus, it is urgent for you to solve this high CPU constantly high in task manager as a result of System Idle Process.
What to do if System Idle Process is High on CPU Usage?
Sometimes, if your System Idle Process is high on Windows 10, computer freezing would also come along with you.
Some problematic driver, software or settings are to blame for this high CPU mistake on Windows 10, follow this post to fix it with powerful ways.
Solutions:
- 1: Automatically Monitor System Idle Process CPU Usage
- 2: Disable Some Programs from Startup
- 3: Close Applications
- 4: Disable Startup Services
- 5: Update Drivers
- 6: Adjust Windows 10 Performance
- 7: Run System File Checker
Solution 1: Automatically Monitor System Idle Process CPU Usage
In the first place, to better manage the CPU usage of the Windows 10 system idle process, you would better make full use the all-in-one software Advanced SystemCare. It is said Advanced SystemCare will provide you with a Performance Monitor and Startup Manager to automatically give a real-time monitor of the processes and programs at startup.
As what above discussed, too many processes, applications running at startup can be the most to blame for the system idle process high CPU on Windows 10. So there is much need to take advantage of Advanced SystemCare to help fix this Windows 10 idle process high CPU error.
1. Download, install and run Advanced SystemCare.
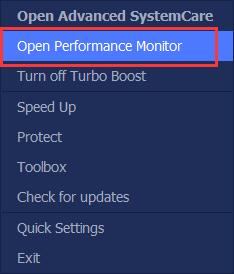
2. Right-click the program icon of Advanced SystemCare on the tool tray at the right bottom of your Desktop to Open Performance Monitor.
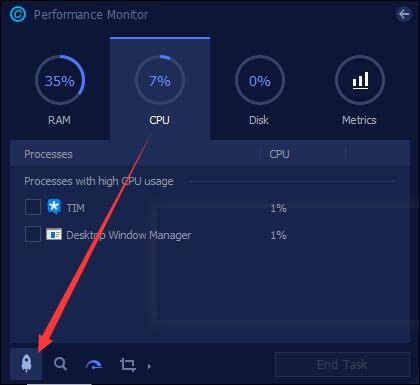
Immediately, you can see the presence of Performance Monitor on the Desktop.
3. On your Desktop, right click the arrow icon of the Performance Monitor to Maximize Performance Monitor.

4. Then under CPU, check the CPU usage of the System Idle process and then hit the rocket-like speed up icon to free up more CPU.
You can supervise Windows 10 high CPU usage when idle from time to time. But it is likely that System Idle Process high CPU persists on Windows 10 as many processes or services will be working at startup. That is why you need Advanced SystemCare to further disable the startup items.
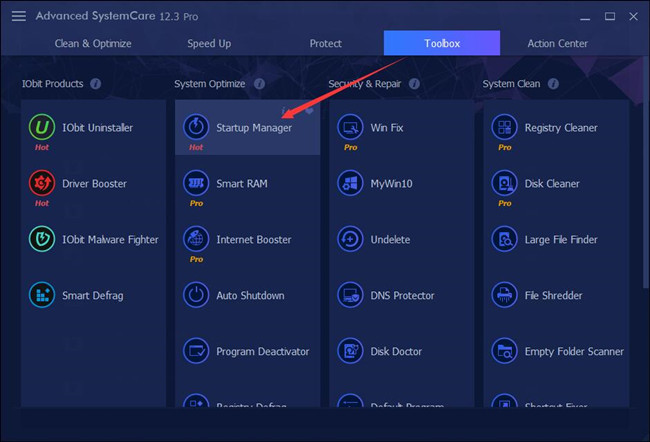
5. In Advanced SystemCare, under Toolbox, hit Startup Manager to install it.
6. In IObit Startup Manager, locate Startup Items, and then decide to set System Idle process or any process using high CPU Disabled.
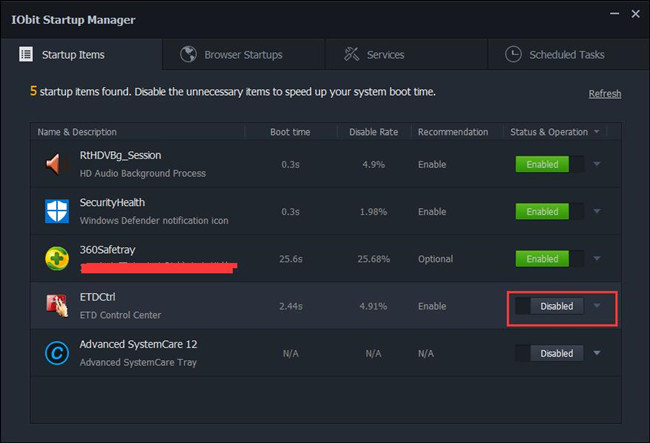
This Startup Manager will disable the process no matter what malware hinders it from doing so. In this sense, you can go to Task Manager to check whether Windows 10 system process high CPU still shows up.
Solution 2: Disable Some Programs from Startup
Windows users are accustomed to installing some anti-malware software for Windows 10, such as Norton, AVG or Mcafee. While they may have no idea that immediately after they downloaded third-party software for PC, the System Idle Process high CPU comes up.
Granted this fact, you would better struggle to disable startup applications or programs to deal with the high CPU trouble.
1. Right click Start and select Task Manager from the menu.
2. Under Startup tab, right click the programs or software to Disable them.
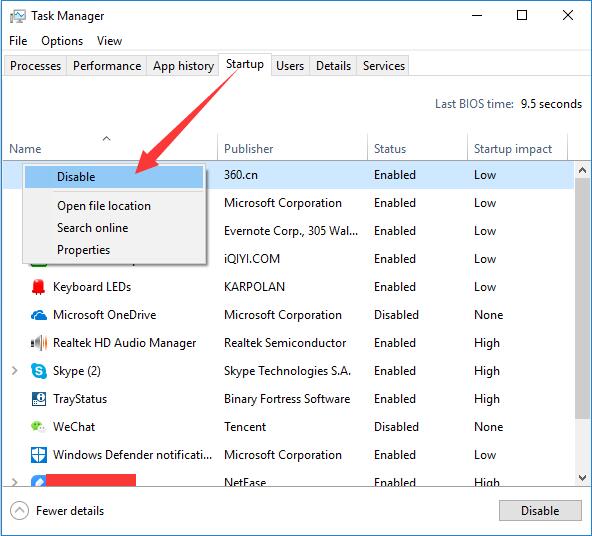
3. Reboot your PC.
Then log on to Windows 10 again and you can see the System Idle Process is not so high in task manager.
Solution 3: Uninstall Applications
For some people, the CPU goes high right after you have just installed some software for Windows 10, in this case, you are strongly recommended to turn these applications off.
2. In Control Panel, set to View by Category and locate Uninstall a program under Programs.

3. In Programs and Features window, right click the application or software to Uninstall it.
4. Soon, restart your computer to take effect.
May your System Idle Process is high in task manager issue can be solved for Windows 10.
Solution 4: Disable Startup Services
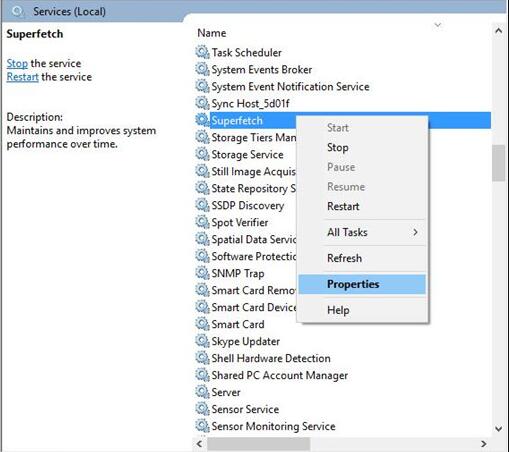
Some services, related to the System Idle Process, such as Windows Update, Superfetch can be the culprits of the high CPU on Windows 10. Consequently, there is much need for you to stop or disable these services to see if it works for you.
1. Press Windows + Run to activate the Run box. In this box, type in services.msc and then stroke OK to open the services window.
2. In the Services window, find out Superfetch and right click it to navigate to its Properties.
4. In Superfetch Properties, under General, locate Startup type and then set Disabled for it. At last, hit OK to save changes.
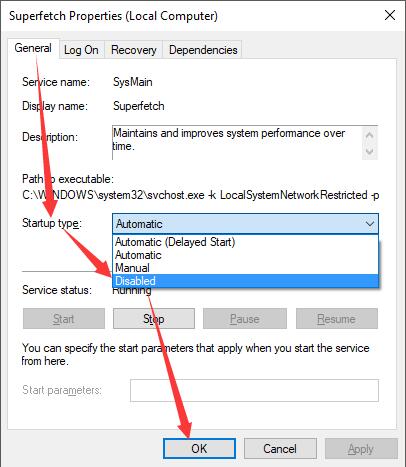
After that, do the same for Windows Update to make it Disabled as well.
All done, you can check CPU usage for Windows 10, maybe the System Idle Process 100% CPU error disappeared from your computer.
If it really happens to you, you can manage to set the Superfetch or Windows Update service startup type as Automatic again later.
Solution 5: Update Drivers
Concerning the driver incompatibility issue, first off, you are supposed to figure out which drivers are responsible for the System Idle Process is high in Windows 10 RATT.exe can help you identify the erroneous drivers on your PC.
According to the reports from people using various Windows Systems, possible device drivers which can run into the high CPU usage with System Idle Process are Network or display card driver or some extensible device drivers on Windows 10.
Under this circumstance, besides getting these drivers manually from the official site or from device manager, the automatically updating way – using Driver Booster can be a perfect choice for computer novices.
1. Download, install and run Driver Booster on your computer.
2. Click Scan, Driver Booster will scan all the devices drivers and find the missing and outdated drivers.

3. Click Update Now. In the scan results, choose all the oudated and missing drivers, the click Update Now.
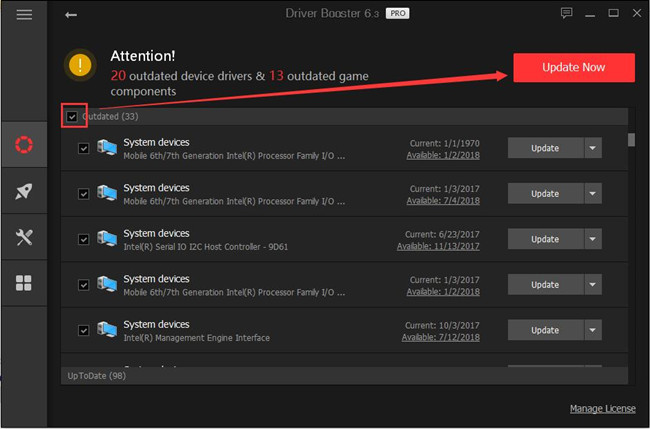
Now you will have successfully fixed the driver issue that may cause the System Idle Process to take up so much CPU.
Solution 6: Adjust Windows 10 Performance
Undoubtedly, the high CPU caused by System Idle Process can greatly impair the performance of your computer, so you have to adjust it on your own.
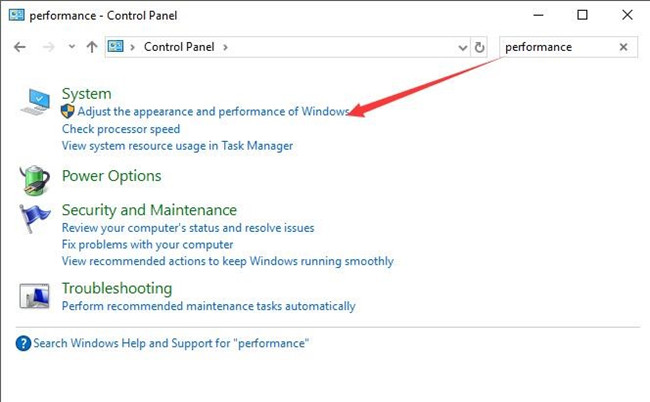
1. Open Control Panel.
2. On the top of the Control Panel window, search Performance.
Then choose to Adjust the appearance and performance of Windows from the results.
3. In Performance Options, under Virtual Effects, tick the box for Adjust for best performance. Then hit OK.
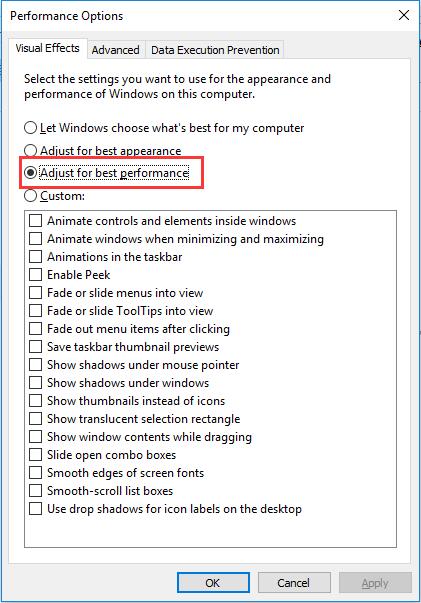
In this way, the animation or cool transition on Windows 10 would all be closed so as to make the best performance for you.
For this time, there will be not so many features on Windows 10 occupies high CPU under the name of System Idle Process.
Solution 7: Run System File Checker
Once you find the System Idle Process is abnormally high on Windows 10 CPU usage, you should consider if there are any corrupted files on your PC.
Why not use the System File Checker (SFC) tool to scan the computer viruses or files? This equipment can well help you not only identify but also correct the improper files.
1. Search Command Prompt in the search box and press Enter to open it.
Here if you are not signing in Windows 10 as Administrator, you are to right click the result to Run as administrator.
2. In Command Prompt, input sfc/scannow and then stroke Enter.
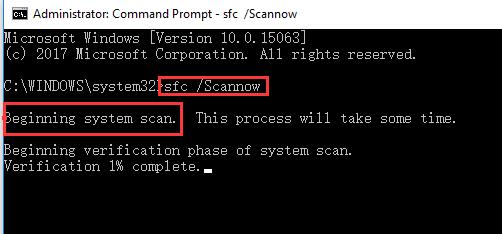
As you can see from the screenshot, this command would let Windows system file checker begins scanning and correcting the problematic files on Windows 10.
Hope your System Idle Process goes high on CPU won’t plague you anymore.
Nevertheless, if the above solutions are useless for you to tackle the CPU problem, you may have to reset virtual memory size in Windows 10.
Above all, for users who can make use of a way or more to deal with the System Idle Process high CPU usage issue on Windows 10, the solutions are available for you all the time.
More Articles:
Fixed: Csrss.exe High CPU Usage on Windows 10