Do you wish to remove Skype from your PC? How do you get rid of Skype? Undeniably, Skype can be a convenient tool for free HD video and voice calls anywhere in the world. However, you may often run into Skype not working on Mac or Windows, or to be specific, Skype not opening or not showing videos or not receiving messages.

In either case, it means that your Skype comes across errors and you need to fix problems with the Skype app. Especially, many users reported that they wish to uninstall Skype for business on Windows 10 or Mac. The following steps can be applicable.
How to Uninstall Skype on Windows?
For people who can’t uninstall Skype, for instance, you noticed that the older version of Skype cannot be removed due to uninstall Skype error 1603, 2503, and 2738, you are supposed to refer to the ways below to delete Skype from Windows 10 or Mac as you wish.
If needed, you can reinstall Skype on your device, which is said to fix various Skype issues like Skype not detecting the camera. With the methods below, you will be able to uninstall Skype on Windows 10 in PowerShell or Control Panel to completely get rid of the Skype app.
Methods:
- 1: Remove Skype from Windows 10 in Apps
- 2: Completely Uninstall Skype in Control Panel
- 3: Delete Skype using PowerShell
- 4: Uninstall Skype Files and Registries
Method 1: Remove Skype from Windows 10 in Apps
On Windows 10, there is a special setting name Apps & Features, which would allow you to get rid of Microsoft Skype directly. In this way, you would better first turn to this setting to uninstall the Skype app.
1. Go to Start > Settings >Apps.
2. Under Apps & features, find out and click Skype and then hit Uninstall.

3. In the pop-up window, click Uninstall.
Wait until the Skype is removed from Windows 10. And then you can go to Microsoft Store to download Skype again.
Method 2: Completely Uninstall Skype in Control Panel
Similarly, there is another tool called Control Panel that manages the programs. So you can delete Skype completely via this tool. In a larger sense, Skype will be uninstalled permanently from Windows 7, 8, 10.
1. Open Control Panel.
2. Locate Programs > Uninstall a program. Here to find out the items quickly, you can View by Categories.
3. In Programs and Features, find out Skype app and right click it to Uninstall it.
In this way, Skype not signing in, or not sending messages is fixed, too. You can reinstall this program as you wish.
Solution 3: Delete Skype using PowerShell
You can also use Windows PowerShell to uninstall Skype from Windows 10, 8, 7. Sometimes, Skype not working error can be solved by an uninstallation if your Skype issue is caused by the corrupted Skype application.
1. Search Windows PowerShell in the search box and then click Enter.
2. Then copy and paste Get-AppxPackage *Microsoft.SkypeApp* | Remove-AppxPackage and press Enter.

Wait until Windows PowerShell finishes the uninstallation of Skype.
Therefore, Skype will not remain on your PC.
Solution 4: Uninstall Skype Files and Registries
Normally, the three ways above are to get rid of the Skype app, so there may be leftover files and registries on your PC. Hence, if you hope to remove Skype completely and permanently, you might as well delete the files and registries of Skype to clear up this program’s leftovers.
1. Select a method above from Method 1-3.
With the Skype app uninstalled, try to remove its files first.
2. Press Windows + R to open the Run box and then enter %appdata% in the box. Then hit Enter to go on.
3. Then in the file folder, scroll down to locate the Skype folder and right click it to Delete.
Then move on to delete Skype registries.
4. Press Windows + R to elevate the Run box and then type in regedit. Then click Enter to get into the Registry Editor.

5. In Registry Editor, click File > Export. Then Save the exported registries in a location on your PC.

That is to back up your Registries on your PC before deleting Skype registries.
6. Then press Ctrl + F and input Skype to find all the Skype registries.

Upon a Skype registry is found, right click it to Delete it.
Reboot your PC to take effect. For this part, you will have got rid of Skype app once and for all.
How to Uninstall the Skype App on Mac
If you would like to uninstall Skype for business on Mac, you can just follow the following steps.
1. Close Skype app completely.
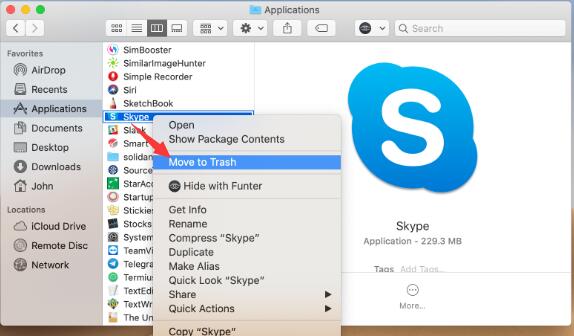
2. Find out the Applicationsfolder and scroll down to find out Skype on Mac.
3. Choose Skypeapp and right click it to Move to Trash.
4. Select Finder and hit Shift-Command-G to go to the Go to the folderwindow.
5. Open ~/Library/Application Support and bring Skype Helperto Trash
6. Open ~/Library/Application Support/Microsoftand drag Skype for the Desktopfolder to Trash. This removes chat & call history, so skip this step if you plan on keeping those.
7. Open ~/Library/Preferencesand take com.skype.skype.plistand com.skype.skype.Helper.plist to the Trash.
8. Then right click the Trash to Empty Trash.
In a word, with this post, you will be able to uninstall Skype from Windows 10 and Mac to fix Skype not working issue. Or if you simply don’t want Skype for business to run on your device, you can just get rid of it by one of the methods in this post. Especially, for some users who wish to get rid of Skype for business on Windows or Mac, you may now feel it extremely foolproof.
More Articles:
Fixed: Skype Camera Not Working on Windows 10
Skype Error: Your Webcam Is Being Used by another Application Windows 10