Even if you encountered the error that RavBG64.exe wants to use Skype on Windows 10, you are able to take some measures to fix this RAVBg64.exe error with Skype. You may as well refer to the following contents, which ranges from what this RavBG64.exe is on Windows 10 and how to resolve RavBG64.exe Skype error.
What is RavBg64.exe and Why It is Requesting Access to Use Skype?
At first, you need to know the RavBG64.exe is not a virus. It has a close connection with your Realtek audio driver. To be more specific, this RavBG54.exe process is designed to allow certain applications for communication, like Skype, to access the audio driver on Windows 10.
So that is why every time you start your Skype, you will be reminded RavBG64.exe is requesting access to Skype. As you may need to take advantage of the video or audio function of Skype software, the process RavBG64.exe will also be required. There exists some bug that could even turn the issue to Skype wants to use RAVBg64.exe on Windows 10. Though recent Skype release has eliminated this error, some of you may still meet it for unknown reasons.
Many Skype users do not want RAVBg64.exe to use Skype on Windows 10, therefore, to help you achieve that goal, this article offers some efficient methods towards the RavBG64.exe.
How to Fix RAVBg64.exe Tries to Use Skype on Windows 10/11?
As this RAVBg64 Skype issue is mainly caused by the version of your Skype, in terms of what you are supposed to solve RavBG64.exe wants to use Skype, you can choose either to reinstall Skype or to change Skype settings for Windows 10. Or sometimes, since the RavBG64.exe is related to the Realtek audio driver, it is available for you to fix audio driver error as well to resolve Ravbg64.exe problem.
Solution 1: Uninstall and Reinstall the Audio Driver
Just as mentioned above, Ravbg64.exe is one of the components of Realtek HD driver package, so you are not supposed to remove this executive files. What you can do is to update your Realtek audio driver in case of driver corruption that gives rise to Skype Ravbg64.exe error.
To make things easier, you would better try to get rid of the audio driver in Windows built-in driver tool-Device Manager and then update it quickly.
1. Open Device Manager.
2. In Device Manager, expand Sound, video and game controllers and then right click the Realtek High Definition Audio to Uninstall device.
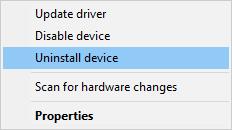
3. Then hit Uninstall to confirm the uninstallation.
There is no need to reboot your PC, just go ahead to reinstall or update the audio driver on Windows 10.
Reinstall Realtek Audio Driver:
Driver Booster can be the most professional for you to update the driver for the audio device, thus solving Skype want to use Ravbg64.exe. As the best driver updating software, Driver Booster will offer you 3 million-plus drivers along with various functions for game, hardware, sound issues. You may now can’t wait to take advantage of Driver Booster to fix this Skype bug.
1. Download, and then install, run it on Windows 10/11.
2. hit Scan to permit Driver Booster to scan for the missing, outdated, and corrupted device drivers, such as Realtek HD audio driver.

3. Here if you noticed there are many other drivers you feel like updating, just choose to Update Now to update all drivers.
Here it is also feasible that you try to navigate to Realtek official site to search for the driver you need.
Once the Realtek audio driver is installed on your PC, you can also notice Skype will not access to use RavBG64.exe on Windows 10 every time you start the Skype app.
Solution 2: Uninstall and Reinstall Skype on Windows 10/11
From Skype site, Skype error that Skype wants to use Ravbg64.exe may result from the Skype applications itself as there may be a bug in it, especially in Skype 7.22.0.109 or later. It is said the recently released Skype has avoided RavBG64.exe is requesting to access to Skype, so it is rather necessary for you to uninstall the old Skype application on your PC and then download the latest one.
So before you get a brand-new and updated Skype, you need to remove the old one.
1. Go to Control Panel.
2. Then under Programs, click Uninstall a program.
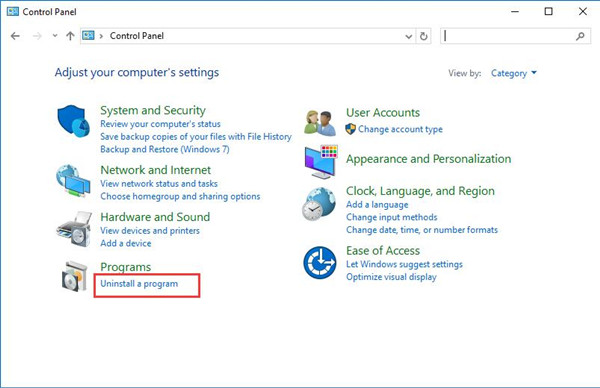
To locate Programs more quickly, you may as well View by Category.
3. In the Programs and Features window, find out Skype and right click it to Uninstall it.
After you uninstalled Skype, you can decide to restart your PC to take effect.
And then move online to search for the up-to-date Skype software and install it on your PC.
With the new features, it is possible that there will be no more bugs that can give rise to RavBG64.exe keeps using Skype on Windows 10.
Or if the updated Skype failed to deal with the RAVBg64.exe with Skype issue, you are also able to make an adjustment to the Skype settings to check if it works.
Solution 3: Change Skype Settings to Fix RavBG64.exe Wants to Use Skype
In the Skype app, there is a choice available for you to decide which programs or processes have access to Skype.In this way, if you hope to let RavBG64.exe not use your Skype, you can attempt to change this setting.
1. Open Skype and the login in with your Microsoft account or any other accounts usable.
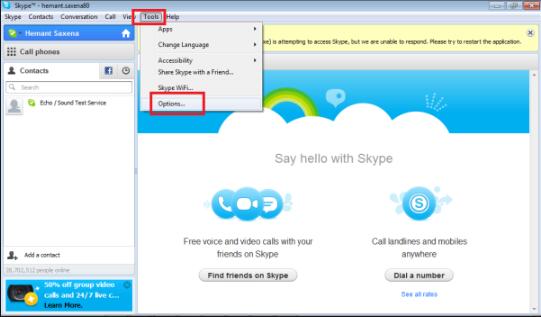
2. Then click Tools and then choose Options from the list.
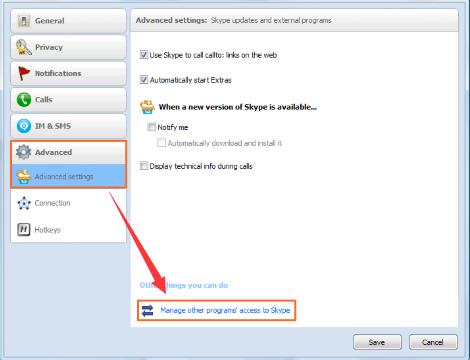
3. Then go to Advanced > Advanced settings > Manager others programs’ access to Skype.
This time, a new window of choices may pop up.
5. Then select RAVBg64.exe from the list and click Change.
6. After that, hit Do not allow and OK.
7. At the same time, choose exe and then click Change.
8. This time select Allow and then hit OK to save changes.
Finally, click OK to save all the changes you have made to both RavBG64.exe and exe.
Upon the time you finished all the steps, RavBG64.exe process will have no access to use Skype on Windows 10 even though it wants to use it.
All in all, for your reference, this post has provided some solutions helpful for RAVBg64.exe keeps asking to use Skype on Windows 10. You will find a feasible method as long as you try one or all.
More Articles:
How to Set CPU Priority to Prefer Foreground Apps
How to Fix NVIDIA GeForce Unable to Connect to NVIDIA Issue
Skype Error: Your Webcam is Currently Used by Another Application