Webex by Cisco is a video conferencing software that can run virtual meetings, screen-sharing, and webinars. It’s convenient and easy for users to hold meetings.
But the question is, how to record a Webex meeting? Since many people want the recording to review the meeting later or share it with people who couldn’t attend.
Don’t worry. This post will present you with five ways to record Webex meetings on Windows, Mac, iPhone, and Android with and without permission. You also will be introduced to an excellent screen recorder to capture your screen and audio freely.
Can you record on Webex?
Yes. Webex has a built-in recording feature available for both the desktop (PC, Mac) and mobile (iPhone, Android) app. The meetings in Webex can be recorded for future reference.
However, recording a Webex meeting with its built-in recording function is only available for the host or alternative host, and you will face certain limitations and restrictions to record.
If you want to record a Webex meeting as a participant without limitations, it is advisable to use your device’s built-in recording tools or simply turn to a professional third-party screen recorder.
We will give you gives easy ways how to record Webex meetings in Webex as a host, and to record Webex meeting as participant with the help of third-party tools even without permission.
Method 1: Record a meeting with Webex’s built-in recording feature (With Limitations)
Because Webex has a built-in recorder, you can record meetings directly using this feature on your PC, Mac, iPhone, and Android.
However, this approach has certain requirements and restrictions. If you want to record a meeting in Webex without any limitations as participant, see Method 2 directly.
Prerequisites of recording on Webex
There are two ways to record meetings in Webex: record on the cloud or record locally on your computer.
The videos recorded on the cloud will be saved as .mp4 file to play directly. However, before its update in Oct. 2022, all the Webex recordings that are saved locally on Windows or Mac would be produced in either .wrf or .arf format, which has to be converted before it can be played.
With its recent (40.10) update, all new recordings in Webex Meetings will be stored in MP4 format, either in the cloud or locally as selected at the site or host level. Read more information from here.
Whether you can use the local or cloud recording functions of Webex depends on your account type.
1. Record a Webex meeting on the cloud
- Webex free plan – Not available
- Webex Starter / Business – Available
- Webex Enterprise – Configured by Webex Site Administrator
2. Record a Webex meeting on your computer (locally)
- Webex Free / Starter / Business / – Available
- Webex Enterprise – configured by Webex Site Administrator
However, apart from account type, your role in the meeting can also influence your recording options.
Only hosts, and co-hosts are allowed to record Webex meetings and events.
Even though you meet the requirements above, there are still some limitations. For hosts to perform local recordings, you need the permission of the site administrator. Besides, co-hosts can only record meetings when the host is absent.
Webex Built-in Recorder for Windows/Mac
Now let’s get to the point, how to record Webex meetings with its built-in recording feature.
Follow these steps to record in Webex on your Windows and Mac.
1. Join a Webex meeting as a host or host, and click the Record button in the right-hand corner.
2. If it is a paid account, you’ll need to choose Record on my computer or Record in cloud. Simply choose the location you want, then click Save.
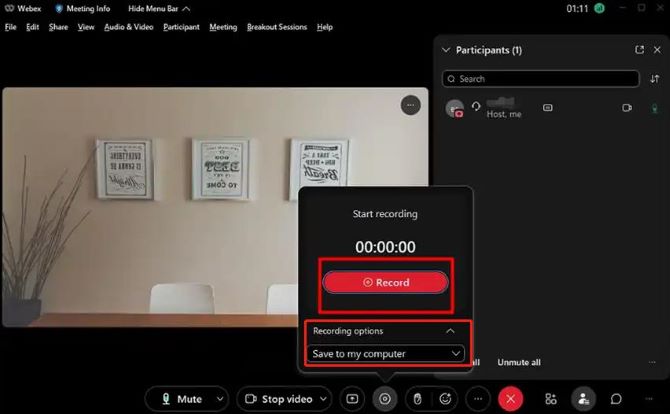
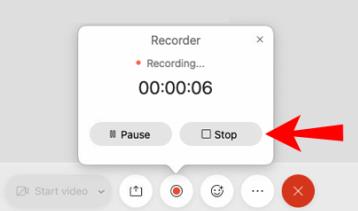
3. The recording will start and a pop-up will appear in the bottom right-hand corner of the screen. You can quickly Pause and Stop the recording from here or click the record button to do so.
Webex Built-in Recorder for iPhone/ Android
Another way you can record your Webex meetings is on your iPhone or Android mobile phone.
Here’s how:
1. Open up the Webex app on your iPhone / Android.
2. Click Start Meeting to launch your meeting, or click Join Meeting.
3. Click More (three dots) at the bottom of the screen, then select Record to start recording.
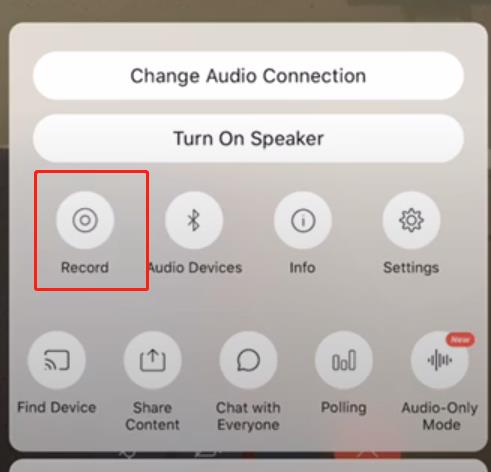
3. Click More (three dots) again, and select stop to stop recording in Webex.
Method 2: Record Webex meeting as participant on Windows (Without limitations)
What if you are not a host or co-host but want to record a Webex meeting as an attendee? Then you will need a tool that allows you to record Webex meeting as participant.
iTop Screen Recorder is a professional-grade recording application that permits all users to record Webex meeting with audio on the Windows platform. No matter what your role is in a meeting, a host, or a participant, you can use this tool to record on Webex, no restrictions, no time limit, and no watermark.
iTop Screen Recorder has many useful recording features that Webex built-in recorder can’t compete with:
- Record Webex meetings even without permission
- Capture Webex screen, audio, and webcam freely
- Record online Webex meetings, sessions, and webinars
- Record Webex videos in HD / 4K with no time limit
- Offer built-in editing tools and multiple output format
What’s more, this Webex screen recorder has a user-friendly interface with clear hints where to click so beginners can know how to record Webex meeting with it quickly.
Here’s how to record Webex meeting as a participant with iTop Screen Recorder.
1. Download and install iTop Screen Recorder on your PC, then run it.
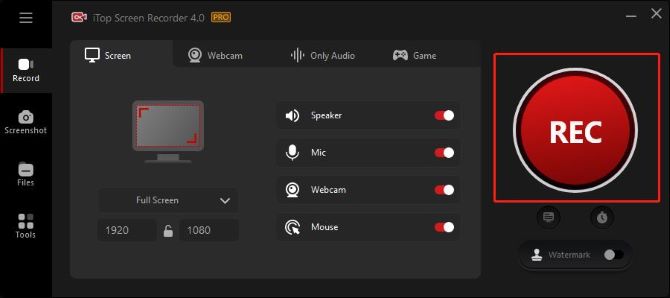
2. Set your recording screen preference. Clicking the drop-down arrow behind Full Screen.

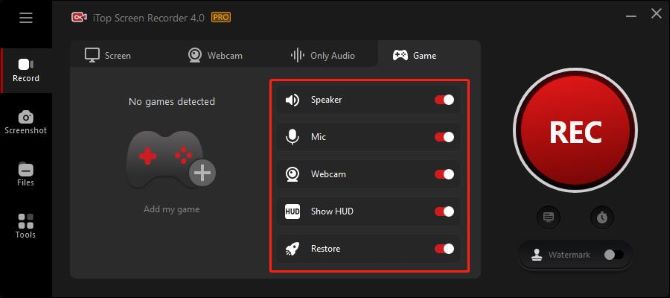
3. Make sure to turn on the Speaker and Mic to record audio at the same time. Open Mouse option, and turn on Webcam to record yourself during the meeting.
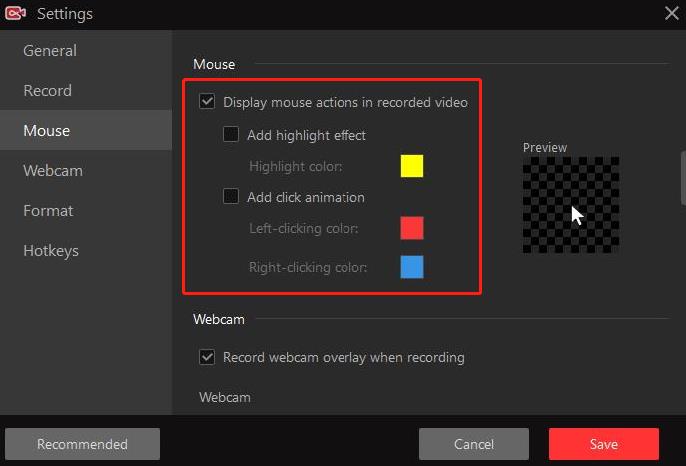
4. Adjust the recording performance. Click on the three lines on the top left, and select Settings.
From here, scroll down to Mouse to display mouse actions.
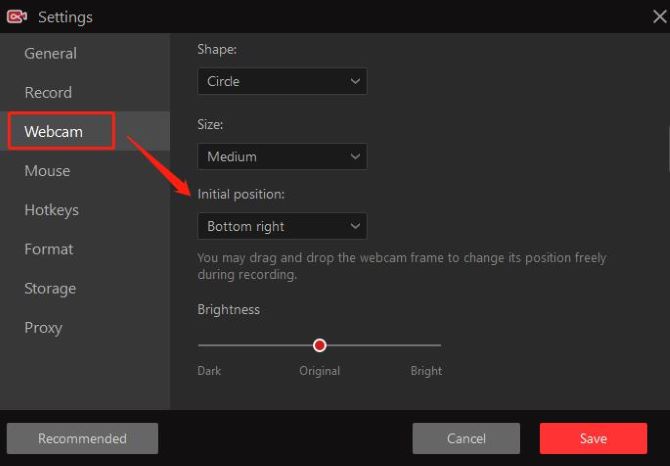
scroll down to Webcam to choose the webcam overlay position and size.
5. Join in or start your Google Meet video call and click the red REC button to start recording.
6. Stop recording by clicking the red top button from the toolbar. Click the Pause icon on the left to temporarily stop recording on Webex.
Tips: The Webex recording will end automatically when you hit the stop button.

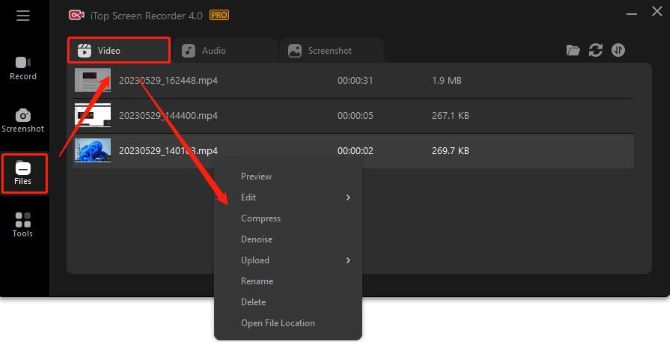
7. The Google Meet recording clip is available under the Files > Video. You can right-click the video name to use the advanced edit, compress, and denoise tool.
Method 3: Record on Webex with audio on Mac (Without limitations)
When it comes to recording a Webex meeting on Mac, the easiest way is to use the preinstalled recording tool, QuickTime Player. It allows you to create a Webex recording of your entire screen or select just a portion of it even without permission.
Simply follow the steps below:
1. Press Command + Shift + 5 to open the QuickTime Player toolbar.
2. From the toolbar, click Options to adjust what you want to record. For example, you can set the location where you want to save your screen recording and select the microphone device of your choice to record on Webex with audio.
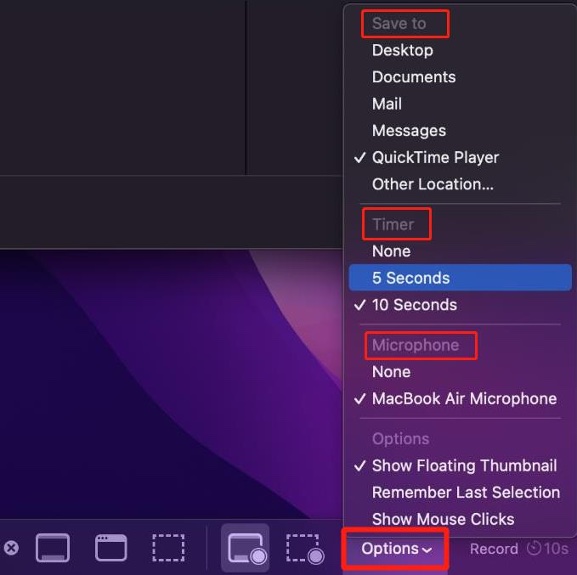
Tips: You can also set a 5 or 10 seconds timer to have a delay for your recording.
3. Adjust your screen recording region.

- Click record entire screen and click anywhere on the screen to start recording.
- Click record selected portion to record only a certain part of your screen, drag over the section you want, then click record.
4. Start or join a Webex meeting. You are now recording on Webex.
5. To stop recording, click the stop recording button in the menu bar on the top right of your screen. Once the recording is finished, the video will pop up, click on it to check the recorded video.

Method 4: Record a meeting in Webex on iPhone without permission
If you’re using an iPhone to record your Webex meeting, it is quite simple even without permission, since Apple provides a built-in screen recorder in your iPhone.
Here’s the step-by-step guide to recording on iPhone:
1. Open Webex and join or start a meeting.
2. Swipe down from the top of your screen, and click the screen recording icon to start recording.
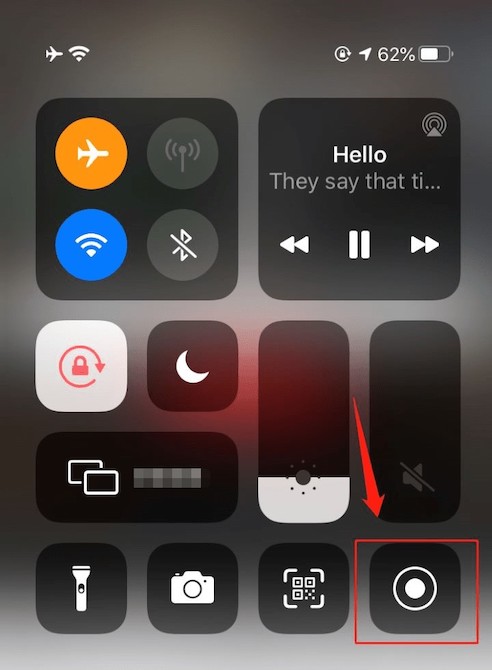
3. Pull down the control center again and press the screen recording icon to stop recording. The recording files will be saved in photos.
Method 5: Record in Webex on Android secretly when not the host
If you’re using an Android device to record your meeting, then follow the steps below to record a Webex meeting without restrictions:
1. Open Webex and join or start a meeting.
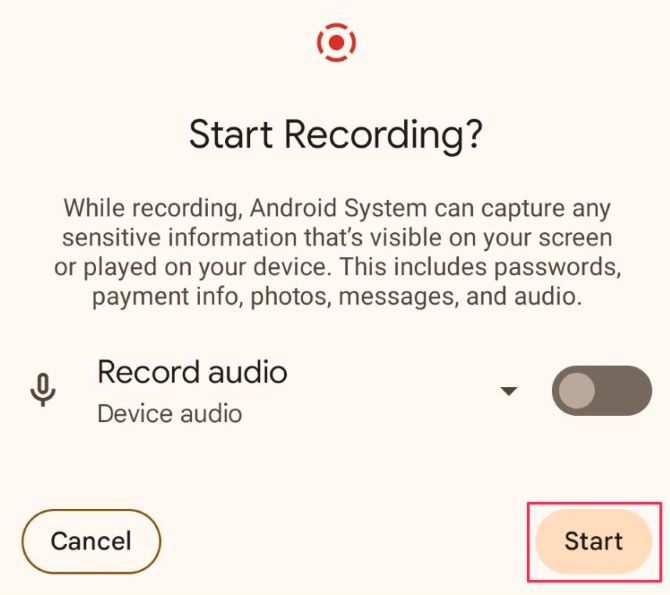
2. Swipe down from the top of your screen and click the screen record option.
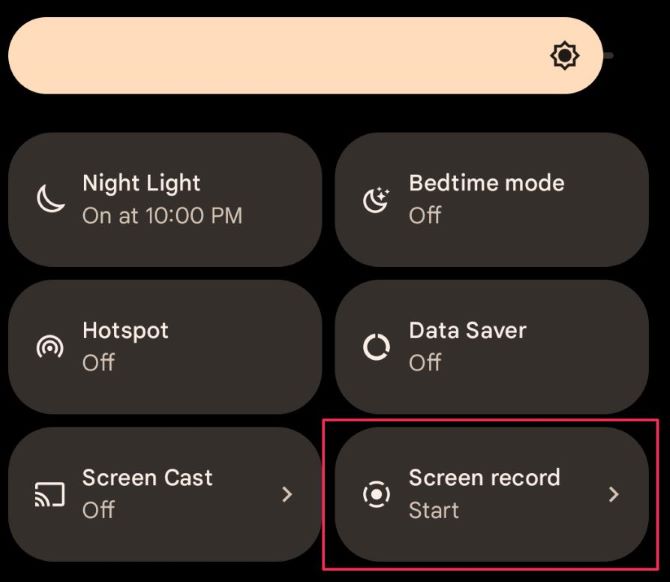
3. Click start to record a Webex meeting.
4. Press the red stop button to end recording on Webex.
You can access your recording in gallery.
FAQs about how to record on Webex
A: It depends on the file size. According to Webex, it will take up to 24 hours to receive your recording. When the recording is ready, Webex will email you with the recording.
A: During your meeting, you will see the recording indicator on the top-right of your window informing you that the meeting is being recorded. However, if someone is recording using their device’s built-in recording features or a third-party app, you won’t be able to tell.
A: If you can’t record a meeting in Webex, consider these factors: you may not be the host of the meeting; your site may be out of recording space; your recording may be disabled. For free users, recording is currently only available from the desktop app. If you are a free user and start a meeting from the mobile app, you can’t record it.
A: Webex stores all your recorded meetings either locally on your computer or your Webex site. You can find your recordings and share or download them from your Webex site. If you were invited to a meeting as an attendee or cohost, reach out to the host of your meeting to get the recording.
A: If you want to include audio in your meeting recording, set up your audio connection. When you begin a recording, choose the Call Using Computer audio option. You’ll receive a warning that your audio won’t record if this option isn’t selected.
A: All the Webex cloud recordings will be saved to MP4 format by default. But before the recent update in Oct. 2022, Webex local recordings were produced in either .wrf or .arf format, which has to be converted before it can be played. Now all new recordings (local recordings and cloud recordings) in Webex will be stored in MP4 format.
More Articles:
7 Ways to Record Zoom Meetings