Occasionally, while you are downloading or updating Steam on Windows 10, this game just can’t be downloaded again on your PC.
You failed to download the Steam for Windows 10 all of a sudden, which means there is something wrong with the game or the system running on your computer.
Unfortunately, it is likely that you find it hard to get the Steam application re-downloaded again on Windows 10 or the steam downloads keep stopping and starting..
Various reasons can be attributable to the Steam game error on Windows 10, from hardware to software, which is similar to games stuttering issue. Let’s get started to solve this Steam downloading stuck at 0% on Windows 10.
How to Fix Steam Download Stopping Windows 10
From what has been discussed above, now you need to cope with this Steam download stopping and starting on Windows 10 now and then, ranging from adjusting the network bandwidth to reinstalling the Steam software from your PC.
Nevertheless, before making things more complicated, wise as you are, you should try to close all the applications or the external devices used on your PC, for instance, plugging out USB device or exiting Chrome for a while to see if it can render Steam into normality.
Even if you find closing all the software or external devices is useless to fix Steam download error Windows 10, you can make minds to deal with this game error as soon as possible.
Solutions:
- 1: Change to Lower Steam Download Bandwidth
- 2: Update the Network Driver on Windows 10
- 3: Make Windows 10 Date and Time Synchronized
- 4: Connect the Steam Client to Internet
- 5: Enable the .NET Framework on Windows 10
- 6: Disable CDPUserSvc_3e1f2 Service
- 7: Clean HTML Caches
- Bonus Tips
Solution 1: Change to Lower Steam Download Bandwidth
It is said that Steam download stopping Windows 10 can be one of the results of the network bandwidth. So if you are unable to download Steam in the current bandwidth, why not go ahead to make an adjustment for the Steam application.
Now manage to choose a suitable speed for Windows 10 Steam.
1. Open the Steam Client and then choose Steam.
2. Then in Steam, on the left pane, select Downloads.
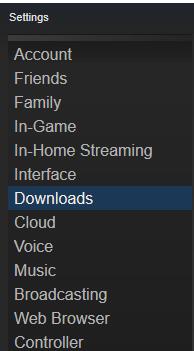
3. Then on the right pane, locate Limit bandwidth to and then choose a value from the drop-down list.

Upon you set a bandwidth data for downloading Steam, get ready to re-download or update Windows 10 Steam to check if you are now qualified to download Steam again.
Solution 2: Update the Network Driver on Windows 10
Since it is an issue closely related to the internet, the network driver is no exception. Therefore, when you found the Steam download stopped on Windows 10, you would better struggle to make sure your network driver is up-to-date and compatible with the system.
Only when the WIFI or Ethernet driver works normally can you download Steam as you wish.
1. Navigate to the Device Manager.
2. In Device Manager, expand Network adapters and then right click the network driver to Update driver.
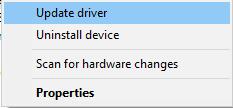
3. Then choose to Search automatically for updated driver software.
To a great extent, you will notice that Windows 10 Device Manager failed to find and install the updated network driver for Windows 10. Under this circumstance, it is worth trying to make use of Driver Booster to get the latest drivers for your network adapters automatically.
Now get ready to allow Driver Booster to update network drivers automatically for you.
1. Download, install and run Driver Booster on your PC.
2. Then hit the Scan button.

Driver Booster will start scanning all the device drivers on Windows 10 for any missing, corrupted and faulty ones.
3. In the search result, locate Network adapters and then choose to Update the network driver automatically.
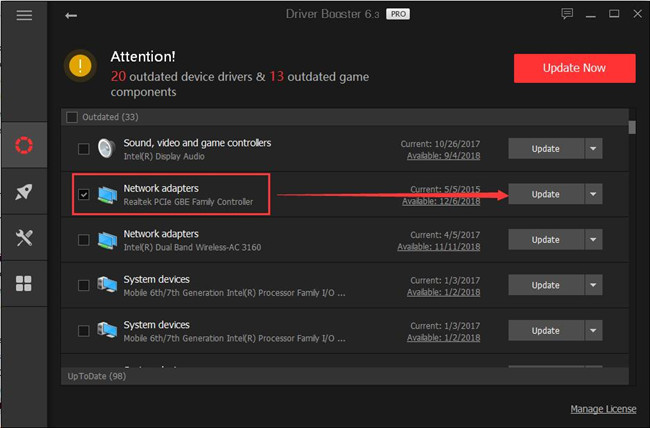
After Driver Booster installed the updated network driver for you, you can also determine to update Steam to check Steam downloading would be stuck again.
Solution 3: Make Windows 10 Date and Time Synchronized
For some default settings, it is said that Steam game will sense the date and time error when you would like to run it on Windows 10.
Chances are that you have not synchronized the time and date with the internet on Windows 10, thus resulting in Steam download stopping and starting.
It will be a boon for you if you can try to change the time and date settings for your PC.
1. Type in date and time in the Search box and then hit Enter to open Change the date and time settings.
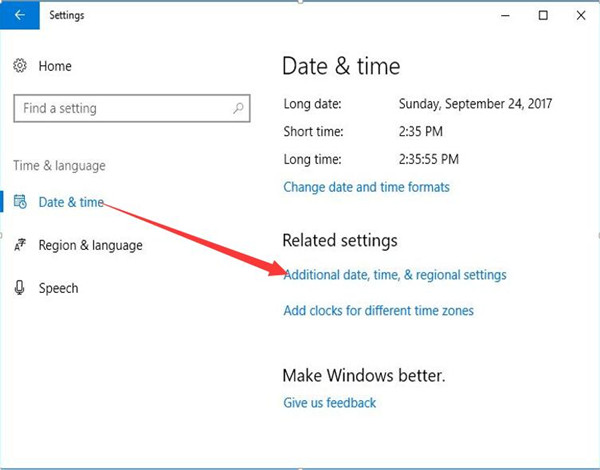
2. Then under Date & time, click the Additional date, time, & regional settings.
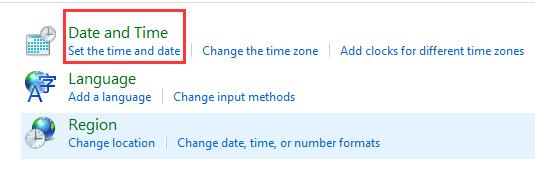
3. Then choose Set the time and date.
4. Then under the Internet time tab, decide to Change settings.
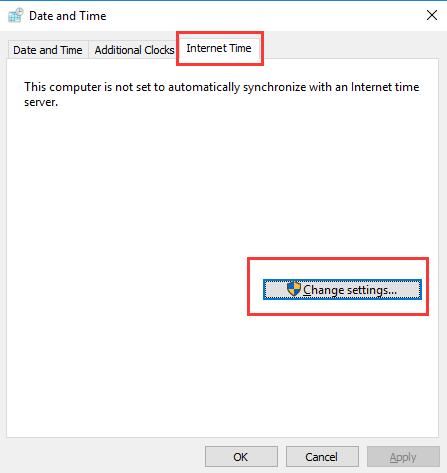
5. In Internet Time Settings, tick the box of Synchronize with an internet time server and then hit OK.
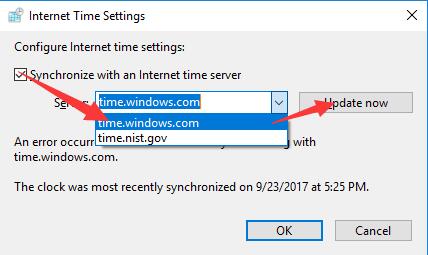
After that, you would be able to get started to download Steam for Windows 10.
Solution 4: Connect the Steam Client to Internet
There are options named Go offline and Go online in steam client, which are used to enable your steam to connect and disconnect the network in line with your need.
It is likely that this option goes wrong, thus making steam download stop and then restart again.
You should reconnect the steam internet to fix steam downloads keep stopping.
1. Open your Steam client from the Desktop.
2. Then in Steam, locate Steam on the top left corner and then choose Go Online.
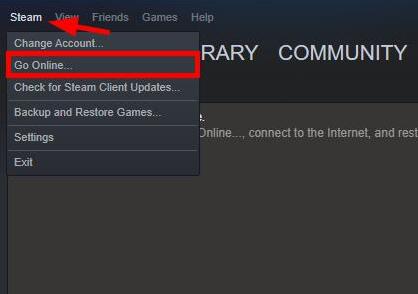
3. Then click Restart and Go Online.
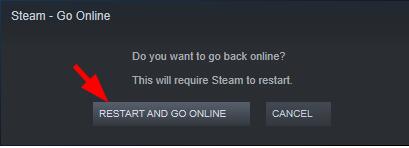
Here you would have enabled the steam network and successfully solved steam downloads stopping error on Windows 10.
Or if you find it is useless to go online, you may as well try to Go Offline and then Go Online again to reconnect the steam.
Solution 5: Enable the .NET Framework on Windows 10
It is known to all game users that some Windows 10 programs require the .NET Framework to run properly. In this sense, it is recommended that you begin to activate the .NET framework for Windows 10.
If you can follow earnestly the steps below, you will find it rather foolproof.
1. Input Turn Windows features on or off and then press Enter to move on.
2. Then in Windows Features window, expand .NET Framework 3.5 and then check the box of the sub-folders.
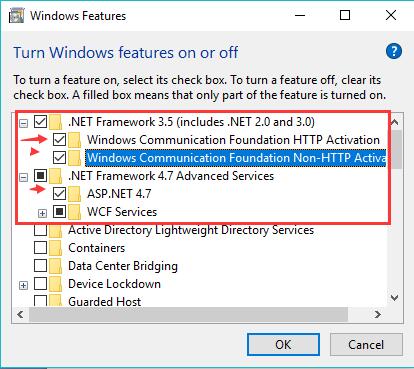
Once you chose to enable all the .NET framework options on Windows 10, obviously, Steam can be downloaded and updated on Windows 10 without encountering any error.
Solution 6: Disable CDPUserSvc_3e1f2 Service
There is another option open to you in hope of fixing the Steam download stopped for Windows 10. It is to kill the process of CDPUserSvc_3e1f2 process.
This service can to some degree lead to your Steam download stuck or not downloading. Now you can try to start to finish this task.
1. Press Windows + R to open the Run box and then enter services.msc in the box. Then hit OK to go to Services window.
2. Then in Services window, scroll down to find out CDPUserSvc_3e1f2 process and then right click it to enter its Properties.
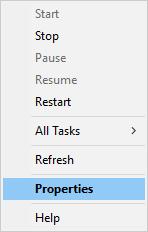
3. Then in Properties window, locate the Startup type and then choose to make it Disabled.
4. Hit Apply and OK to save changes.
Tiresome as you may be, now you can set about downloading the Steam application on Windows 10 and installing it if possible.
Solution 7: Clean HTML Caches
As this steam not downloading is to some extent a network issue, it is likely that the previous HTML caches can lead to the problem.
Refer to the steps below to clear up the caches.
1. Right click This PC to move into File Explorer.
2. In File Explorer, go as the path: C:\User\username\AppData\Local\Steam\htmlcache.
3. Then right click the HTMLcache folder to Delete it.
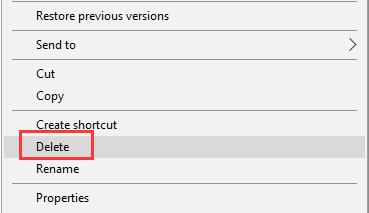
Now, you can see the HTML caches are removed from Windows 10.
Then spare no effort to re-download the steam again to check if you can download it.
In a word, in terms of the Steam download stopped or Steam downloading is stuck at 0% on Windows 10, apart from the solutions above, you can also resort to some other ways. For instance, disable Windows Defender or try to uninstall the Steam application from Control Panel.
Bonus Tips – Set Game Mode for Steam Games Automatically
For gamers, it matters to gain enhanced gaming experience. So after you fixed Steam download stopping for Windows 10, you would better make full use of Advanced SystemCare to speed up the system for your game and change your PC into the Game mode when playing games.
Numerous game lovers proved it rather useful to boost games with the help of Advanced SystemCare. You may as well try to utilize it for Steam games.
1. Download, install and run Advanced SystemCare.
2. Locate Speed up and then attempt to Turn on Turbo Boost for Game Mode.
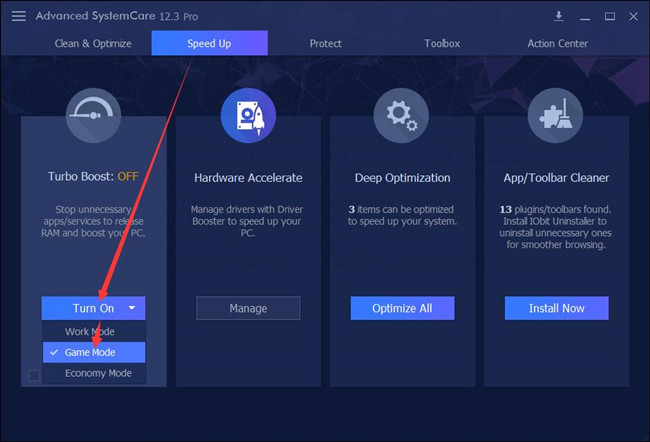
In this way, Advanced SystemCare will end the unnecessary and non-windows programs other than your game so as to boost the game. You can now feel free to enjoy the games.
More Articles:
Solved: Steam Disk Write Error
How to Fix Steam Won’t Connect to Internet
Fixed: Origin Won’t Open on Windows 11, 10, 8 and 7 (2023 Update)

