Call of Duty: Warzone is a battle royale video game that players can play for free. It has a built-in instant voice chat feature that friends can use to communicate with each other. However, many players have reported that Warzone voice chat does not work for some players from time to time. Don’t worry if you also experience this problem. Here are some possible solutions you can try.
Today, through this article, we will show you 8 different solutions to fix Warzone voice chat not working. These solutions cover PS4, PS5, Xbox One, and PC.
Solution 1: Checking Your Connection
Sometimes, your Warzone voice chat not working is just caused by a careless setting. So double-check that your microphone is not muted. This is by far the most common reason why voice chat isn’t working. Also, check that the cable is not damaged and is firmly plugged into the correct headphone jack.
Solution 2: Set Your Default Sound Output Device
Several affected users have confirmed that if you are playing Warzone with a microphone or a playback device that is not set as your default communication device, there is a high chance of Warzone voice chat not working.
So follow the steps mentioned below and they will help you to fix the Warzone game chat not working issue by setting your microphone as the default output device.
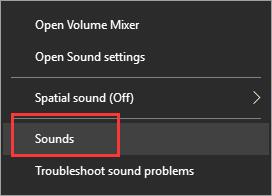
Step 1: At the lower portion of the screen, right-click on the speaker icon and select Sound settings.
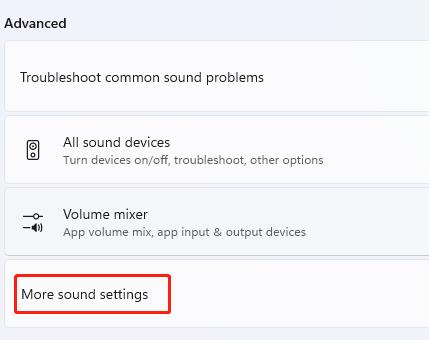
Step 2: Scroll down and click on the More sound settings option.
Step 3: Select the Recording tab.
Step 4: Right-click on the device that you’re currently using and then select Set as Default Device and then Set as Default Communication Device from its context menu.
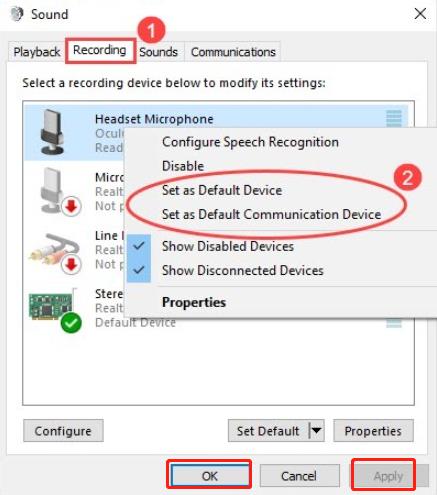
Step 5: Click Apply and hit OK.
Solution 3: Allow Access to the Microphone
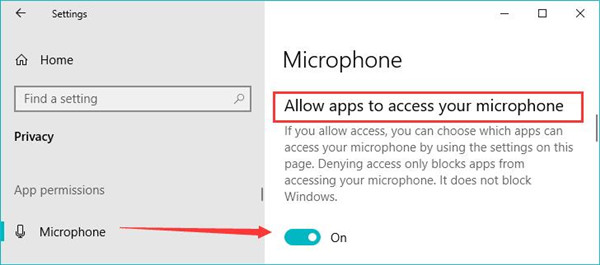
Likewise, you can allow Warzone access to use your microphone in Windows’ privacy settings. Microphone access is never automatically or defaulted to Warzone. So you must enable it now.
Follow the instructions below to fix the Warzone voice chat not working by allowing Warzone to access your microphone.
Step 1: Open the “Start menu.”
Step 2: Search for “Microphone Privacy settings” and click it.
Step 3: Enable the “Microphone access” and allow all apps to use the microphone device.
Solution 4: Set Open Mic Recording Threshold to a Minimum
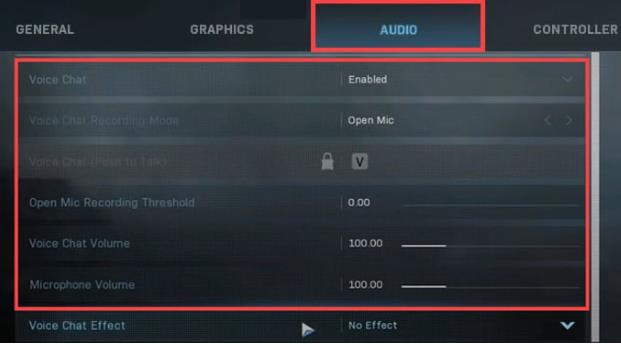
Many users who have encountered this issue claim that one of the most typical situations where you are experiencing this issue is when the current open mic recording threshold is set to a high level.
So, if you find that Warzone in-game chat isn’t working properly, you can check your in-game audio settings and modify them if necessary.
Step 1: Open COD: Warzone.
Step 2: Go to the Options Menu.
Step 3: Select “Audio” from the menu.
Step 4: Select “Enabled” for voice chat.
Step 5: Lower the Open Mic Recording Threshold.
Solution 5: Turn off Push-To-Talk on Warzone
The Push-to-talk function helps you suppress background noise by automatically muting the microphone. However, you can end up with voice chat issues when playing the Warzone game because you didn’t set it up properly.
Therefore, please make sure to turn off the push-to-talk feature in Call of Duty Warzone. Doing this will make it easier to properly check your in-game mic.
Step 1: Launch Call of Duty Warzone.
Step 2: Click on the Settings icon on the top right side of the screen.

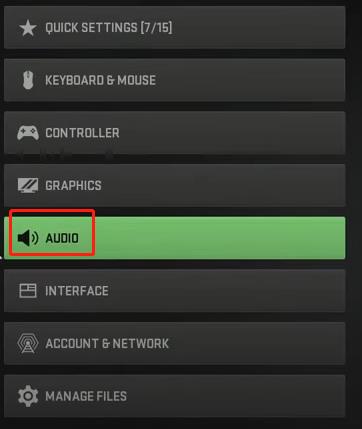
Step 3: Now choose the “Audio” option from the left side.
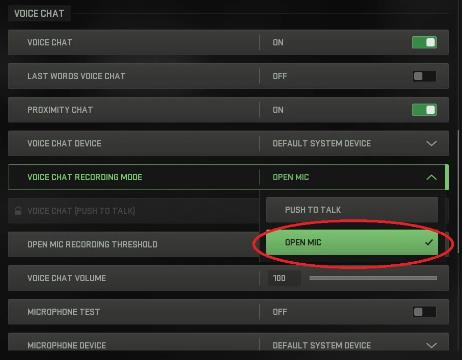
Step 4: Scroll down to “Voice Chat” and then click the drop-down menu of “Voice Chat Recording Mode”.
Step 5: From the options, choose “Open Mic” and Apply the changes.
Solution 6: Update the Audio Drivers
Outdated audio drivers are one of the most common reasons behind almost all issues. Therefore, another basic way to fix the Warzone voice chat not working error is to update the audio drivers. You can update drivers manually using the Device Manager, however, this may require some level of computer literacy. Therefore, it is recommended that you use a professional third-party tool to automatically update the audio driver.
Driver Booster is a tool that can scan and detect outdated and missing drivers, and game components and update them regularly. The program scans your computer’s drivers and automatically updates them from a database of over 3,000,000 drivers and game components. Driver Booster provides you with useful tools to fix more common computer issues, including no sound, no network, and resolution issues.
In addition to the main function of driver updates, Driver Booster also helps improve the gaming experience by updating game components on your PC. It has added the Game Boost function, which can maximize the use of system resources with just one click, ensuring faster and smoother game performance. So if you want to update your audio drivers automatically, Driver Booster can do it.
Step 1: Download, install and run Driver Booster on your Windows PCs.
Step 2: Click the icon Scan.

On the home screen, you can see a big Scan button that you can’t miss. You can scan your system for faulty and outdated drives by clicking this Scan button. After the scan is complete, you can see the scan result on the screen.
Step 3: Update your audio driver automatically.
You can click the “Update Now” button at the top of the scan results page to have Driver Booster update all unqualified drivers in the list. You can also download audio drivers individually by clicking the “Update” button to the right of each drive.
Solution 7: Enable Crossplay Chat (Xbox One Only)
If you’re gaming on Xbox One, the first thing you need to do is make sure your privacy settings are set to allow crossplay chat. If you don’t, you won’t be able to communicate with the game on various platforms.
Follow the steps below to set up your headset to talk to players on Xbox One:
Step 1: Go to General Settings on your Xbox.
Step 2: Click Online safety and family.
Step 3: Go into Privacy and Online Safety.
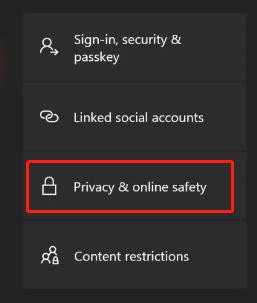
Step 4: Select Xbox Privacy.
Step 5: Go into View Details and Customize.
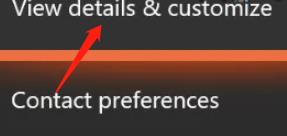
Step 6: Click Communication and Multiplayer.
Step 7: Select Cross-network play.
Step 8: Toggle it on.
Solution 8: Set the Microphone Correctly (Xbox One, PS4, PS5)
Finally, you need to make sure you’ve set up your device correctly. Here’s how you can allow access to your microphone on your PS4, PS5, and Xbox.
For PS4:
Step 1: Turn on the PS4.
Step 2: Now head to the Settings menu.
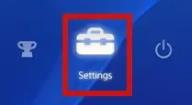
Step 3: In the Settings menu, choose Devices.

Step 4: Click on “Audio Devices” and then press Input Device.
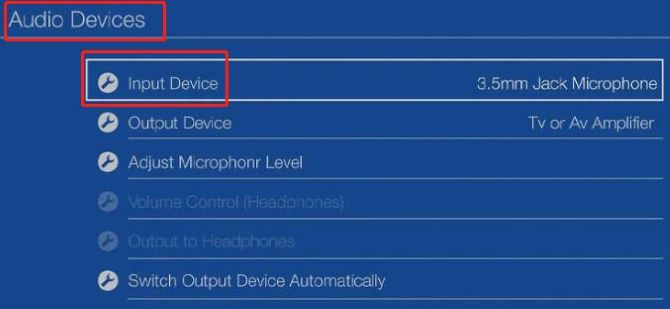
Step 5: Now choose the headset that you plugged into your controller from the list of options.
For PS5:
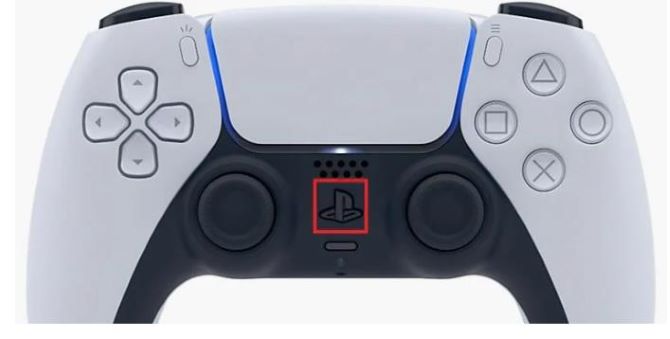
Step 1: Press the PS button.
Step 2: Select the Mic icon.
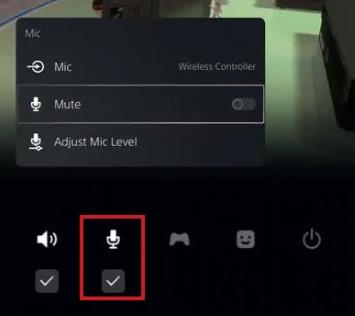
Step 3: Select your Input Device.
For Xbox:
Step 1: Press the Xbox button on the controller to open up the quick menu.
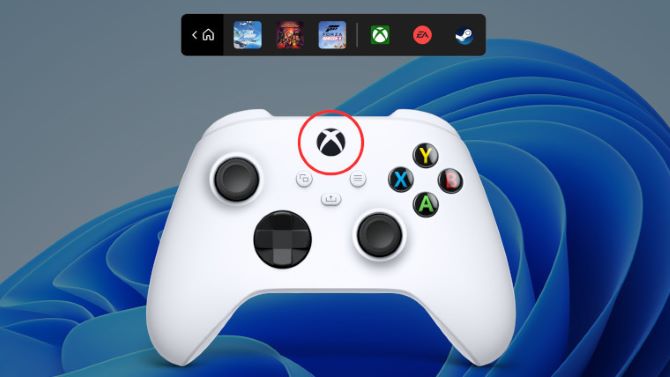
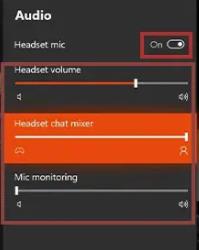
Step 2: From the list of options at the bottom, choose “Audio and Music”.
Step 3: Make sure the first option, “Headset Mic” is Turned On.
Conclusion:
After trying all of the above, run the Warzone again to check if the problem recurs. Hope the eight solutions can help you solve the problem of Modern Warfare voice chat not working. If not, the microphone you’re using is probably broken. Please take it to a repair shop.
More Articles:
[10 Ways] Error Code Diver (6) in Call of Duty: Warzone

