Contents:
- Windows Modules Installer Worker High CPU Usage Overview
- What is Windows Modules Installer Worker on Windows 10?
- Why Tiworker.exe Uses So High CPU on Windows 10?
- How Do I Fix Windows Modules Installer Worker High CPU?
Windows Modules Installer Worker High CPU Usage Overview:
Windows Modules Installer Worker high CPU often comes to you after you checked Windows 10 updates, or installed some drivers and programs on Windows 10.
Sometimes, upon your computer runs slowly or keeps loading in games, you tend to check what CPU usage in task manager, but what you find is a process named Tiworker.exe or Windows Modules Installer Worker taking up so much CPU resource, 50% or even 100%. To worsen the tiworker.exe high CPU error, Windows Modules Installer Worker high disk or memory usage followed up on Windows 10.
In this article, you are able to find powerful ways to fix this high CPU by the Tiworker.exe process.
What is Windows Modules Installer Worker on Windows 10?
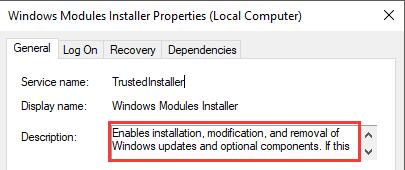
According to its service description, the Windows Modules Installer Worker is the process used to enable installation, modification, and removal of Windows updates and optional components.
Thus you can see that the Tiworker.exe service is closely related to Windows update or application installation. Normally, Windows 10 updates itself automatically, meanwhile, Windows 10 Modules Installer Worker try to fix the updating errors or bugs left behind.
If you have any actions about Windows update, install a new one, uninstall the update, etc. This process would always work in the background and lead to Windows Module Installer error in some cases.
Why Tiworker.exe Uses So High CPU on Windows 10?
If there are any updates for Windows 10, considerable Windows Modules Installer Worker would come up to check for updates. In this way, though these Tiworker.exe services are running in the background, CPU will also go high.
Under this circumstance, you would better try some methods to solve this Tiworker.exe high CPU error for Windows 10.
How Do I Fix Windows Modules Installer Worker High CPU?
On Windows 10, you can manage to utilize various ways to stop the Tiworker.exe process from using so much CPU, for instance, disable Windows Update service from automatically running on Windows 10.
Solutions:
1: Change Windows Modules Installer to Manual
3: Disable Automatic Windows Update
4: Run Windows Update Troubleshooter
5: Delete SoftwareDistribution Folder
7: Run System File Checker and DISM
Solution 1: Change Windows Modules Installer Service to Manual
Generally speaking, for the sake of convenience, you would be suggested to set the Tiworker.exe service to automatically serve for Windows update. But now concerning Windows 10 Modules Installer CPU issue, you may try to make it manually. In this way, Windows Modules Installer won’t run automatically.
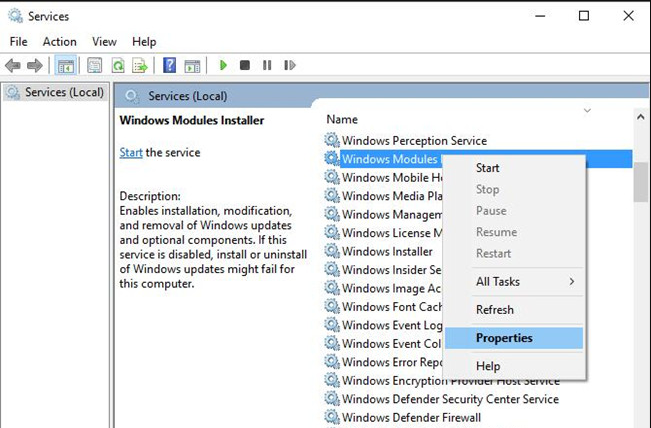
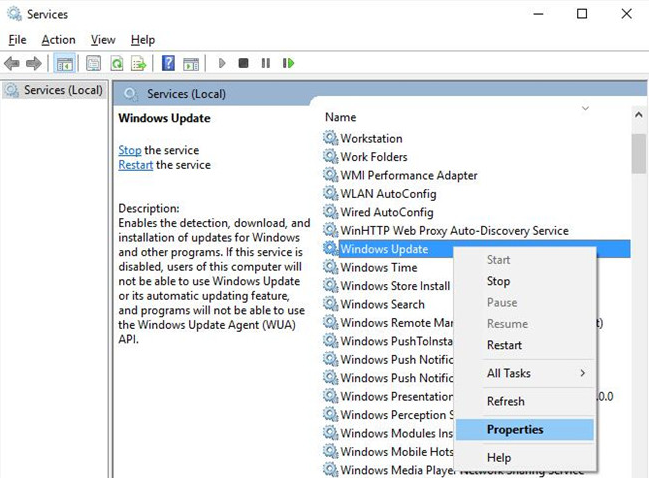
1. Press Windows + R to activate the Run box.
2. Type in services.msc in the box and hit OK to open Services window.
3. In Services, scroll down to locate Windows Modules Installer and right click it to navigate to its Properties.
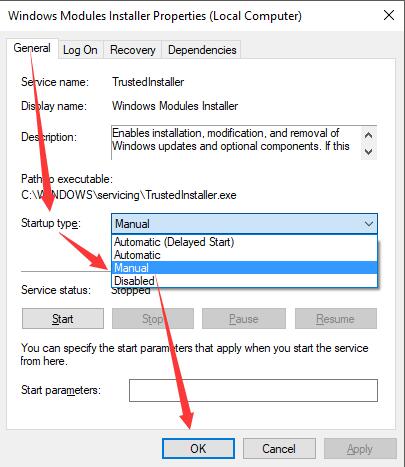
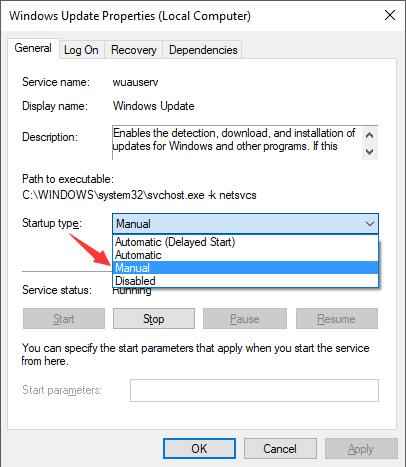
4. In General tab, find out Startup type and choose to set it as Manual. Then click OK to save the change.
Once you made this change, check the CPU usage in Windows 10 task manager. Maybe the Tiworkker.exe process would not eat up CPU for this moment. To some degree, Tiworker.exe high disk can also be fixed.
Solution 2: End Windows Modules Installer Worker Process
On the other hand, it is also feasible to stop Tiworker.exe process in hope that windows modules installer worker high CPU can be fixed on Windows 10.
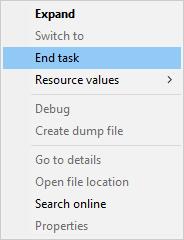
1. Press Ctrl + Alt + Delete combination key to elevate task manager.
2. In task manager, scroll down to find exe (Windows Modules Installer Worker) process and then right click it to End task.
3. Reboot Windows 10 to take effect.
If disabling Tiworker.exe can help resolve high CPU usage by Windows Modules Installer Worker in Windows 10, now you can see the 100 CPU usage or disk is nowhere to be seen on your PC.
Solution 3: Disable Automatic Windows Update
If you have known for sure what the Windows Modules Installer Worker do on Windows 10, you can get why you are advised to turn off the option to update Windows automatically.
Like what you do in Solution 1 to set the Windows Modules Installer startup type as manual, to disable the automatic Windows update, do the same thing in Services.
1. In Services, pinpoint Windows update and open its Properties.
2. Make Windows update Startup type as Manual and then hit OK to take effect.
In this way, you are enabled to decide the time you are to update Windows rather than by itself automatically. But it is wise for you to check for updates in Update & Security to make sure you can receive the new features offered by Microsoft.
Thus, the CPU usage by Windows Modules Installer worker will be reduced greatly on Windows 10.
Solution 4: Run Windows Update Troubleshooter
Though Microsoft has released online Windows update troubleshooter, you may know that there is an inbuilt tool for you to troubleshoot Windows update errors, among which Tiworker.exe high CPU is what you are meeting with on Windows 10.
Hence, utilize this Microsoft Windows update troubleshooter to figure out and then fix the Tiworker high CPU problem.
1. Go to Start > Settings > Update & Security.
2. Under Troubleshoot, find out Windows Update and click Run the troubleshooter.
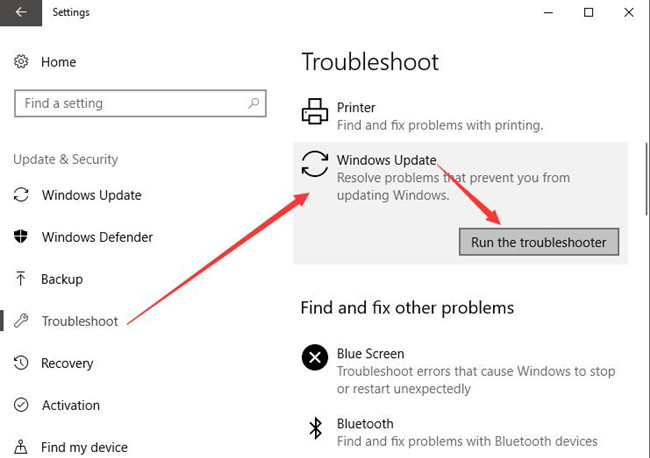
If there are any updating issues on your PC, this troubleshooter would let you know and fix them for you if possible. Or you can also download the online troubleshooter to solve the high CPU usage by Windows Modules Installer.
Solution 5: Delete SoftwareDistribution Folder
There is a folder saving the temporary files left by Windows 10 update, driver or program installation. As per what discussed above, Windows Modules Installer Worker high CPU on Windows 10 can be caused by the corrupted Windows updates, you might as well manage to remove this SoftwareDistribution folder for Windows 10.
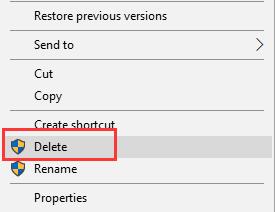
1. Open the File Explorer from the search box.
2. In File Explorer, find out C:\Windows\Softwaredistribution and then right click this folder to Delete.
you can open task manager to check if the Tiworker.exe process keeps hogging much CPU or disk.
Solution 6: Update All Drivers
Driver incompatibility can cause Windows Modules Installer Worker high CPU on Windows 10 in some way. On the other hand, now that you have upgraded Windows 10, it is necessary to make sure the drivers on your PC are the most up-to-date.
It may seem extremely troublesome to download all the device drivers on corresponding official site, such as AMD, NVIDIA, Intel site. Therefore, it is strongly recommended for you to update the graphics card, video or sound card drivers or network drivers automatically by Driver Booster.
Driver Booster is professional and reliable in downloading and updating drivers for Windows 10. You may as well take advantage of it to tackle the Tiworker.exe high CPU trouble.
1. Download, install and run Driver Booster on Windows 10.
2. Click Scan.

Driver Booster will begin to find the missing, corrupted, and faulty drivers on your PC.
3. Allow Driver Booster to Update Now to get all drivers updated.
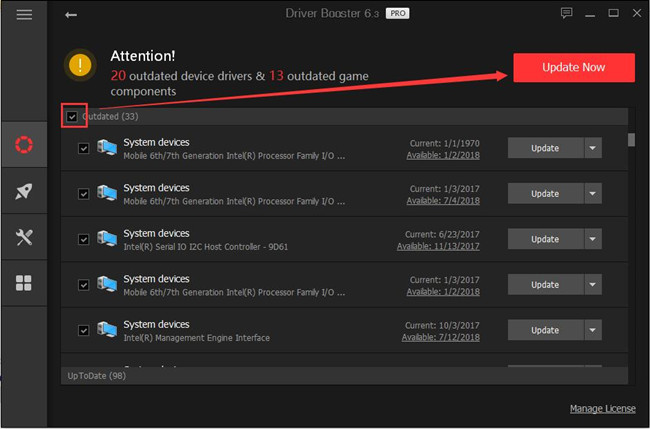
After Driver Booster downloaded the latest chipset or display card drivers for your computer, you may as well restart your computer to take effect. In some sense, these newest drivers can be helpful in solving high CPU by Windows Modules Installer Worker on Windows 10.
And this is also the method feasible to address any high CPU usage problems, such as WMI Provider Host high CPU usage and Ntoskrnl.exe high CPU usage on Windows 10.
Solution 7: Run System File Checker and DISM
To exclude the possibilities that it is the system files causing high CPU by Tiworker.exe, you can use SFC tool to scan for your computer on Windows 10. Especially when you updated Windows 10, there may some incompatible or corrupted files, you need to correct them.
1. Search Command Prompt in the search box and right click the result to Run as administrator.
Then stroke Enter to get to Command Prompt.
2. Input sfc/scannow in the Command Prompt and press Enter to use SFC.
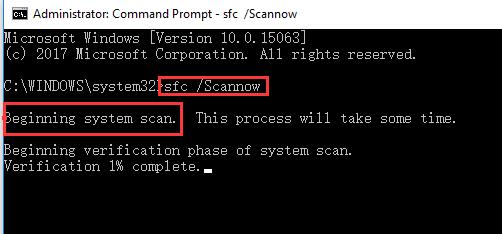
You can see that the System File Checker begins system scanning.
This is to repair corrupted system file that may lead to Windows Modules Installer Worker high CPU usage on Windows 10.
Run DISM
Alternatively, if you find there is something wrong with the system image on your computer, it is accessible to scan for the image issues with the Deployment Image Servicing and Management(DISM).
To use DISM to fix the Tiworker.exe high CPU issue, follow the steps below:
1. In Command Prompt (as administrator), type in the command: DISM /Online /Cleanup-Image /RestoreHealth
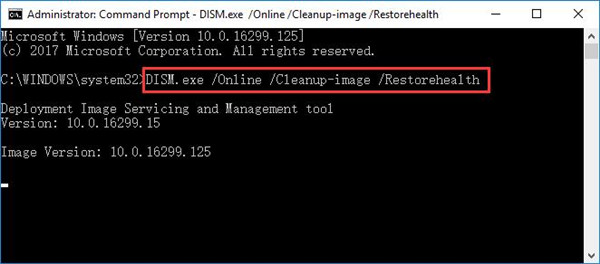
2. Then Stroke Enter to execute it.
Then DISM tool would automatically scan for the problematic system images and fix them for you.
Granted that there are no corrupted system files or image errors on Windows 10, the high CPU by Windows Modules Installer Worker can also disappear.
More Articles:
Solved: Windows Image Acquisition High CPU Usage on Windows 10