We often copy, paste, and cut on Windows systems, while these functions are also available on Mac. However, people can’t cut files and paste them directly on MacBook but copy files firstly and then go back to the original folder to move the files to Trash, so it is troublesome.

This article will tell you how to cut and paste Mac files to move them to different locations with different methods.
If you are a heavy user of Windows and doubting why there is no Cut option on Mac, you can refer to this part.
If you find there is a Cut option but it is unavailable, you can fix this Mac Cut issue here.
If you only want to know how to cut files on Mac, you can read this part.
Why there is no Cut on the Right-Click on Mac?
Different from the right click on Windows with options of Copy and Paste, there is only Copy option on Mac without Cut option. Why?
This is a heated topic online. Some people argued that it was likely that Apple considered the “Cut” option a threatening issue. If you wrongly cut a file or document, it may cause data loss or the application not working. Sometimes, it will cause system crashes.
However, for users who have just changed from Windows to Mac, it would be challenging to adapt to the new experience of copying and pasting on Mac. After all, “cutting” is frequently used in daily use. Long-time use will turn into a habit for many users.
Why is Cut Option Grey Out on Mac? How Do I Enable it on Mac?
As it is known to all, there is no cut option in Mac right click. However, many users may have noticed that there is a Cut option under the Edit menu at the top menu on the Mac desktop. After you select a file or folder and wish to use the Cut option at the top menu, it is grey and unavailable. It means that you can’t use the Cut option on Mac or in Finder.
Why won’t my Mac let me cut? To protect the file security, you cannot enable it on Mac when cutting files or folders.
In fact, the Cut option on Mac is not used to cut files or folders but to cut text, pictures, text links, and so on.
When you browse a webpage or open Pages to copy and paste text, pictures, or links, you will find the Cut option is available. Actually, you can only enable the cut option on text cutting on Mac.
Having known about all these details, it will be easier for you to copy and paste on Mac. In fact, all methods below can be applied to MacBook Air, MacBook, Pro, iMac, and Mac Pro.
Next, you can learn how to:
- Use Shortcut to Cut and Paste Files on MacBook (Without Mouse)
- Use USB Keyboard to Cut and Paste on Mac
- Use Mouse and TouchPad to Cut and Paste on Mac
- Use Menu Bar to Cut and Paste Files
- Add Cut Option to Right-Click on Mac
Use Shortcut to Cut and Paste Files on MacBook
On Mac, users can use keyboard shortcuts to copy and paste text, pictures, files, applications, or folders. Here are two different situations.
Here is the first case. When you cut words or pictures in documents in Office, there is a specific shortcut.
Mac Cut text (Not file) shortcut is:
Command + X
This combination shortcut is similar to that on Windows (Control + X).
Another case is to cut documents, files, images, applications, folders, etc. You can select a single file or multiple files using this shortcut.
Although there is a shortcut for Mac to Copy files, Mac has no specific Cut shortcut. If you want to cut a file or folder, you should also use the Paste shortcut.
Mac Cut and Paste file shortcut is:
Command + Option + V
Below are steps to move file location using the shortcut:
1. Select the file or folder that you want to move, and then hold down Command + C to Copy it.
2. Open the file location, and press Command + Option + V to Cut and Paste.
You will then notice that the original files have disappeared, while you will find the copied files in the destination folder. In this way, you will have completed copying and pasting with the combination shortcut Command + option + V.
What is a Windows USB Keyboard Shortcut for Cut and Paste on Mac?
If you are using the standard ANSI USB keyboard for MacBook or iMac or Mac Pro, what are the cut and paste shortcuts?
When you are using a USB keyboard, there is no Cut shortcut on macOS. Hence, on Mac, even if you are using a standard 101- or 102-key keyboard, you can Cut and Paste.
In fact, when you are using a Windows USB keyboard on Mac, the default Command key works like Windows, while Option works like the Alt key.
Hence, Mac USB keyboard Shortcut for Cut and Paste is:
Win + Alt + V
If you want to alter the shortcuts of the USB keyboard on Mac, you can configure it in System Preferences.
Use Mouse or Touchpad to Cut and Paste Files
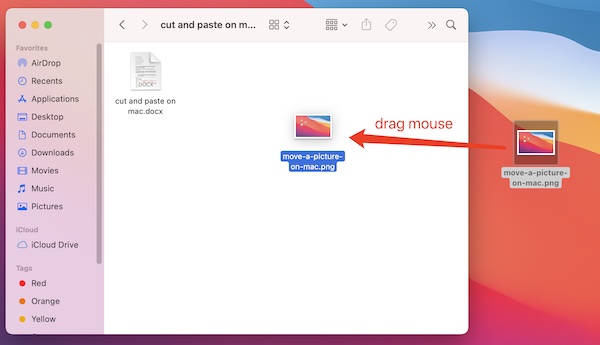
How to move files on Mac? It is a common method to use the mouse and Touchpad to move a document to a folder. You can drag a document or folder to another location to move it. This method is foolproof and understandable.
Select a picture and then hold down the mouse left-click and the Touchpad to drag the picture to the new location, and then release the mouse and touchpad. This method allows you to move files on mac without copying them.

Interestingly, when you drag hundreds of or thousands of files, the mouse pointer may hover on the screen. Do not worry! It shows that your Mac is processing the moving files.
How to Use Menu Bar to Cut and Paste Files
Although the Cut option in the menu is disabled, you can still cut and paste files in the menu. While the Options shortcut is needed. Below are steps about how to move documents into a folder on Mac.
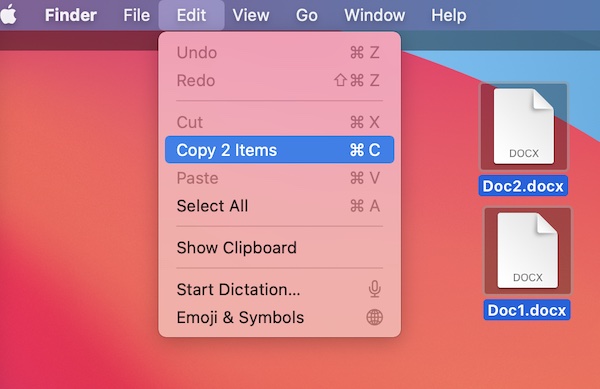
1. Select two documents on Mac desktop like doc1.docx and doc2.docx.
2. In the top menu, select Edit > Copy the 2 items.

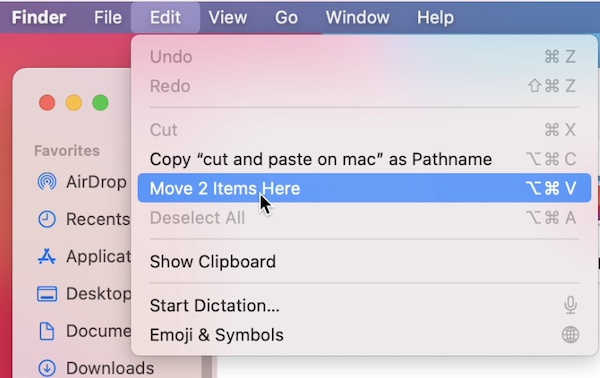
3. Open the destination folder, and you will see the Finder menu at the top menu.
4. Hit Edit to open the drop-down options and hold the Option shortcut.
Then you will see two new options: Copy xxx as pathname and Move items here.
5. Select Move items here to finish cut and paste documents.

Add Cut Option to Mac Right-Click to Cut and Paste Files
If you are using both Windows and Mac at the same time and you want to cut files and create new documents using the Right click on Mac, it is also viable.
Although there is no inbuilt Mac application to help users add new options to the right-click menu, you can download a third-party application to copy and paste. There are many third-party applications for MacBook to copy, cut, and paste, which can also allow Mac users to add Cut and Paste to the right-click menu.
For instance, XtraFinder is an excellent tool that works like Finder on MacBooks. This tool adopts the interface of Finder, and users can use it to manage Mac files. You can download it from Mac App Store, or you can learn more about it before installing it on your Mac, https://www.trankynam.com/xtrafinder/.
If you want to add the Cut option to the Mac mouse right-click menu, you can download and install this application, you can go to System Preferences to check the box “Add Cut and Paste” for XtraFinder.
Besides, iRightMouse is also a good option. It can also help you create the cut, new text, new pages, new word, and new excel through the right-click menu. You can also download it from Apple Store or the official website: https://www.irightmouse.com/.
Summary:
Compared with copying files to move them, cutting files is more space-saving and more effective on Mac. After all, after cutting files and folders, the original file will not occupy disk space. With this article, you may have known how to add the Cut option to the right-click menu and cut and paste in different cases.
More Articles:
How to Free Up Disk Storage on Mac


