Many people encountered a problem that when they went to the Microsoft store to download the NVIDIA control panel but told that the download failed.
Another problem is that when you right click the desktop but find the NVIDIA control panel is missing or cannot be opened, an error message pops up: NVIDIA driver is not installed in your system. So, how to install the NVIDIA control panel correctly and solve these problems?
Why Your NVIDIA Control Panel Cannot Download and Installed?
As per Microsoft requirements, you need to meet four conditions before installing NVIDIA Control Panel.
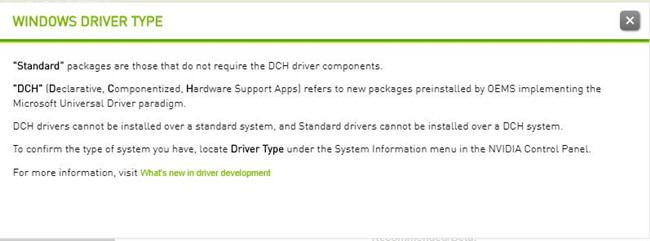
1. The DCH version drivers have been installed along with NVIDIA graphic card (How to check if my driver is DCH Version)
Note: NVIDIA provides two versions of drivers: one is the Standard driver and the other one is DCH driver. After upgrading to Windows 10 version 1803, if you want to use the NVIDIA Control Panel, you should install NVDIA DCH Drivers.
2. Microsoft Windows 10 Fall Creators Update or later (version 1803 build 17134 or higher)
3. X64 CPU
4. Windows Update Services is running
We know NVIDIA control panel is a very important NVIDIA graphics card management software. It is mainly used to manage the performance of all aspects of your graphics card and provides special game settings to ensure you can get the most optimized gaming experience.
Related: What is GWX Control Panel?
How to Check What Driver Type is Installed on Your NVIDIA Graphic Card?
To meet the requirement of Windows systems, NVIDIA has released another version of the driver installation package – DCH. So, how do you judge whether your driver version is Standard or DCH? Here is the method.
1. Open Control Panel by right clicking your mouse on the desktop.
2. In the toolbar, select Help > System Information. Then in the system information window, you will see a Driver Type.
3. Here your graphic driver type is Standard.
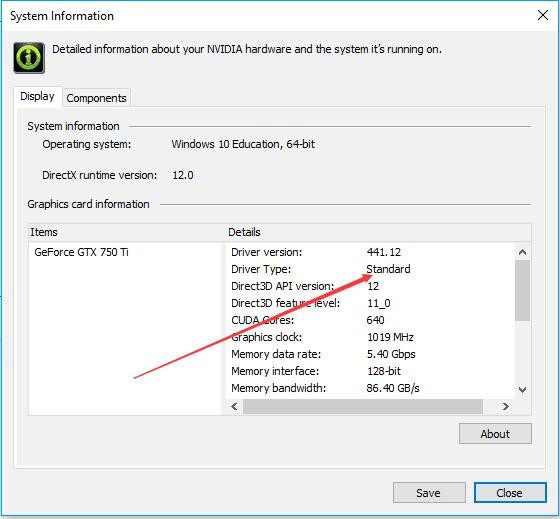
If your Windows driver type is standard, you do not need the NVIDIA Control Panel. But if you need it to customize your game settings, you can follow the next methods.
2 Ways to Download NVIDIA Control Panel on Windows 10/11
Here you can get NVIDIA Control Panel in two ways. You can follow the automatic way or manual way to install it.
Preparations before downloading NVIDIA Control Panel:
For standard NVDIA drivers, since it does not have NVIDIA Control Panel, at first you should uninstall the NVIDIA graphic drivers, and here is the tutorial: how to uninstall NVIDIA drivers completely.
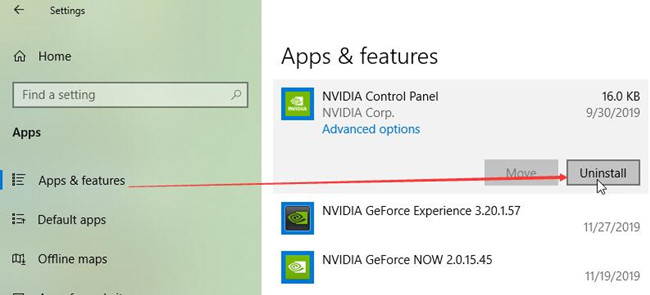
For DCH NVDIA drivers, you might have installed the NVIDIA Control Panel, you should at first uninstall it with these steps: Windows > Settings > Apps > Apps and Features. In the Right-side, find the NVIDIA Control Panel to uninstall it.
How to Download NVIDIA Control Panel Automatically
The NVIDIA control panel is no longer included in the standard version of the NVIDIA graphics driver package. If you need to use it, you need to download the DCH version of the graphic driver. The DCH version of the driver installation package includes the NVIDIA control panel.
1. Go to NVIDIA Drivers Download Page.
2. Select all the items: Product Type, Product Series, Product, and Operating System. And in the Windows Driver Type select DCH from the drop-down list.
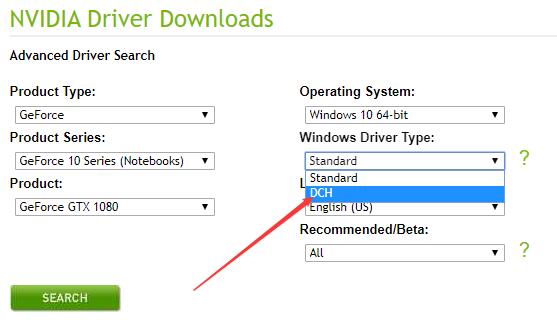
Tips: The default Windows Driver Type is Standard, so you should select DCH manually.
3. Click Search. Then all the DCH NVIDIA drivers will be listed.
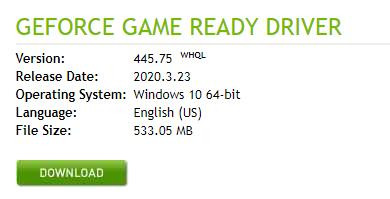
4. Select the latest version of NVIDIA driver to download.
5. Double click the setup file to install the NVIDIA driver.
6. Restart Windows 10.
Now, on the desktop, right-click your mouse and you will see the NVIDIA Control Panel appears and you can open it to customize all settings.
Download NVIDIA Control Panel Manually
In some cases, when you installed the graphic driver, you did not find it or you came to the error that the NVIDIA control panel installation failed. At this time, you can manually install it through the Microsoft Windows store.
1. Go to Microsoft Store. You can type store in the search box to open it directly.
2. Search NVIDIA Control Panel. In the result list, you will find it.
3. Click the link to go to NVIDIA Control Panel download page.
4. Click Get button to get it free.

Tips: Here you will see there is a warning below the download button. If you want to download NVDIA Control Panel, there is the minimum system requirements.
Minimum System Requirements for NVIDIA Control Panel:
| OS | Windows 10 version 17134.0 or higher |
| Architecture | x64 |
| Keyboard | Integrated Keyboard |
| Mouse | Integrated Mouse |
| DirectX | Version 9 |
| Memory | 1 GB |
Recommended System Requirements for NVIDIA Control Panel
| OS | Windows 10 version 17134.0 or higher |
| Architecture | x64 |
| Keyboard | Not specified |
| Mouse | Not specified |
| DirectX | Version 11 |
| Memory | 1 GB |
If you cannot download NVIDIA Control Panel from Microsoft store, you may need to delete the temporary file first. Here is the specific tutorial:
1. Type disk or disk cleanup in the search box to open the disk cleanup program.
2. Select the drive such as C:\drive that you want to clean and then click OK.
3. Select Cleanup system files and then click OK. Now in the pop-up window select C:\drive again. Then click OK
4. Drop down the scrollbar and find the temporary files you want to delete it and then click OK.
After you deleted the temporary files, return to Microsoft store to download NVIDIA Control Panel again, and it will not show the error this time.
More Articles:
Solved: NVIDIA Control Panel Missing on Windows 10/11
Fixed: AMD Catalyst Control Center Cannot be Started Windows 10/11
Fixed: NVIDIA nForce Networking Controller not Working Windows 10/11

