One of the dreadful situations for most computer users, including Mac users, is losing your important files. Data loss is something that nobody wants but it occurs as the result of various actions that are performed on our computers. If you are the victim of such a data loss, you will probably want to find a way to get your lost data back.
In this guide, you will learn the various ways the data gets lost on a Mac, and how you can go about recovering that lost data on your Mac machine.
How Does the Data Get Lost on a Mac?
Like said earlier, there are many reasons your Mac’s data can get lost. The following are some of the possible cases in which you can end up losing your files.
Malware or Virus
Although the number of viruses and malware is relatively lower for Mac, there are still some viruses that can affect your Mac machine. If your Mac catches a virus that is harmful to your data, you risk losing the files and other content saved on your Mac.
Suspicious Apps
There are apps that look trustworthy from the outside but they do infect your Mac and get your data deleted without you knowing about it. Most apps obtained from the Mac App Store should be fine, but you need to be cautious about the ones downloaded from various websites.
Accidental Deletion
It might be that you wanted to delete an unwanted file but you accidentally ended-up deleting an important file. This accidental deletion can sometimes make you lose your important data.
How to Recover Lost Files on a Mac with Ease
Now that you are aware of some of the scenarios, possibly including the one in which you lost your data, let us take a look at some of the ways you can regain access to the lost files on your Mac.
Method 1. Use a Data Recovery Software to Recover Lost Files on a Mac
While there are several ways to recover lost files on a Mac, many of those ways are not as convenient or feasible to use as a file recovery software. The quickest and most convenient way to get your deleted files on a Mac is to use a professional tool like EaseUS Data Recovery Wizard.
EaseUS data recovery software offers two versions. It makes Mac data recovery easier than ever. Using this software, not only can you restore the files that have been deleted from your Mac but you can do so without having any kind of backup at all. The tool scans your drives deep down, finds the files that can be recovered, and allows you to selectively restore your data on your Mac.
If that sounds good to you, the following shows how you use this program to recover your Mac data.
Step 1. Scan the Source Drive
Install the program on your Mac and launch it. On the main interface, select the drive where your lost data was located, and then click the “Scan” button next to it.
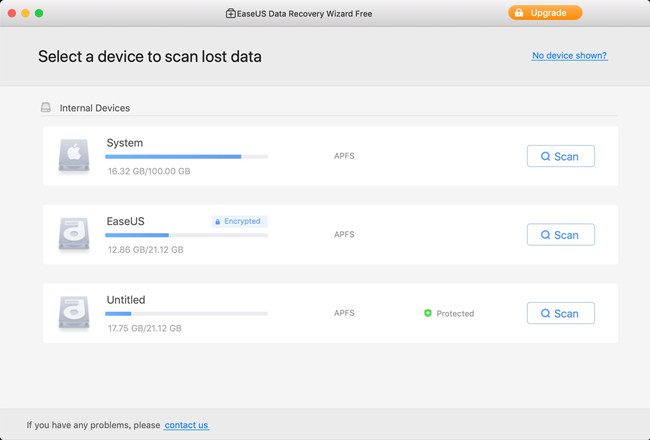
This will scan your drive to find recoverable files.
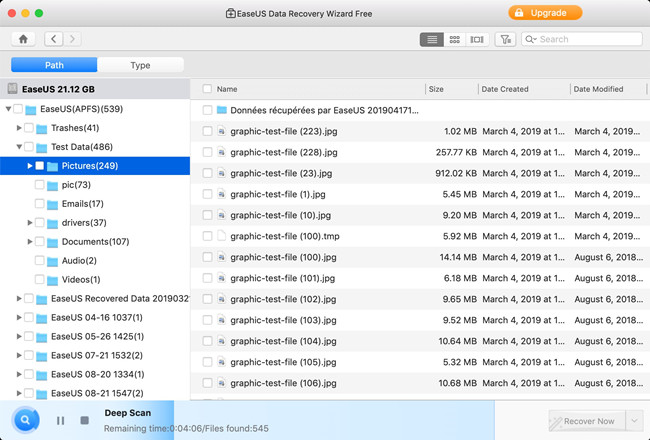
Step 2. Let the Tool Find Your Lost Files
You will get to see your recoverable files as the tool scans your drives. The progress of the current scan is displayed in the bottom of the app.
Step 3. Recover Your Lost Mac Files
When the scan is finished, find the files that you would like to restore in the list. Click the files that you want to recover so that they are selected, and then click the “Recover Now” button in the bottom-right corner.
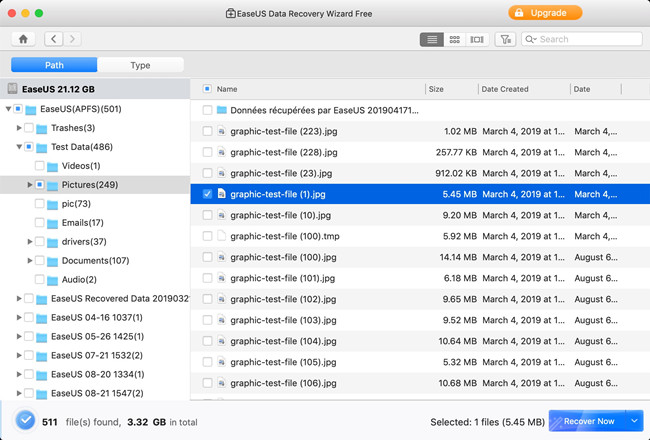
That is all there is to it. Your lost files should now be back on your Mac.
Method 2. Use the Trash
A good thing about both Windows and Mac computers is that your files are not permanently deleted when you press the Delete key. On a Mac, when you delete a file, your file is actually moved to the Trash. The file stays here for a month and then it gets removed for good.
If it has not been thirty days since you deleted your files, it is likely that your files are still available in the Trash. If so, you can move your files from the Trash back to their original location.
Step 1. Click the “Trash” icon in the “Dock” and the Trash will open.
Step 2. Find the file or files that you would like to recover.
Step 3. Right-click on any one file and select “Put Back”.
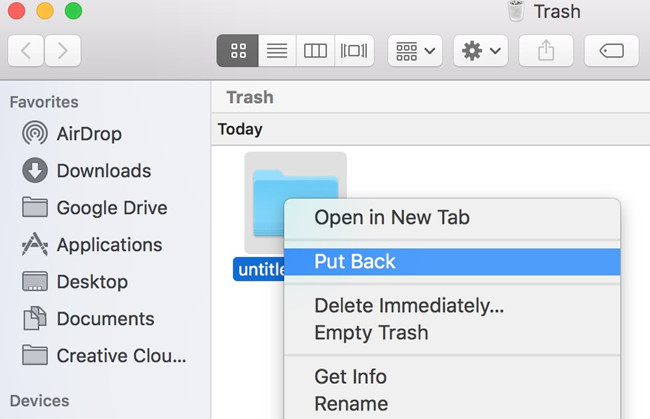
Step 4. Your selected files will be recovered.
Method 3. Use Time Machine
If you do not already know, Time Machine is a built-in backup solution for your Mac. This utility allows you to back up your files to external storage devices as well as it backs up some of your files itself as well.
If you have Time Machine enabled on your Mac, you can use it to see if an old undeleted version of your file is still available on the storage. Checking this and getting your lost files back is extremely easy, and here we show how you do that.
Step 1. Open a Finder window and navigate to the folder where your deleted files were located.
Step 2. Click the “Time Machine” icon in the menu bar at the top and select “Enter Time Machine”.
Step 3. Select the time frame from the options on the right.
Step 4. Click your file in the Finder window and select “Restore” to restore your deleted file.

Method 4. Undo Delete Your Mac Files
If you have not performed many actions after deleting the file on your Mac, you can actually retrieve your file by undoing your action. Like most apps, Mac’s Finder comes with the undo delete option and you can use this to undo your action and get your deleted file or files back.
This should only work in those rare cases where you deleted a file but then you did not perform any other actions. The Finder should display the option to get your deleted files back.
Step 1. Make sure you are inside a Finder window.
Step 2. Click the “Edit” menu at the top and select “Undo Move of”.
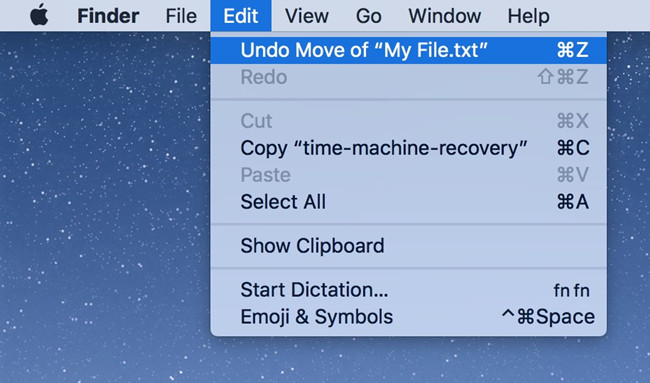
Step 3. The file that was moved to the Trash will now be put back in its original folder.
Conclusion
If you want a convenient and easy way to recover lost files on your Mac, EaseUS Data Recovery Wizard is the tool to go for. You can try out other options, though, if you feel they can help get your files back.
More Articles:
System Restore: What is and How to on Windows 10
How to Backup Emails to External Storage on Windows 10
Fixed: the Backup Application Could Not Start Due to an Internal Error