Minecraft: Failed to Write Core Dump, Minidumps are not enabled by Default on Client version of Windows
When you are trying to connect to a server, Minecraft pops up a warning reminding you “Failed to write core dump. Minidumps are not enabled by default on client versions of Windows”.
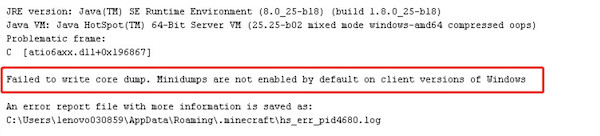
Users are rather frustrated when the video game Minecraft stops working as minidumps are not enabled by default on client versions of Windows. Fortunately, this post will offer effective solutions to get rid of this core dump error, as proved by many users.
Why Did Minecraft Fail to Write Core Dump?
There are some causes of this “failed to write core dump” error. The most common ones are:
- Incompatible graphics card driver with the updated Windows system. You need to update the driver for the integrated graphic card like NVIDIA, AMD, or Intel graphics card to ensure it supports the video game Minecraft;
- Disabled VSync and Triple Buffering settings in the NVIDIA control panel. The VSync and Triple Buffering settings are essential for Minecraft to load, so you need to enable them to run for the gameplay.
- The corrupted AMD Catalyst software. According to user reports, when they failed to install this AMD program, chances are that Minecraft failed to write a core dump.
Note: What is the core dump in Minecraft?
Many of you may even do not know what a core dump means in games like Minecraft, not to mention fix the core dump failed issue. In short, a core dump refers to a memory snapshot of a running process, and it is often automatically created by the operating system when errors happen.
How to Fix “Failed to write core dump” Minecraft Error?
You need to troubleshoot your Minecraft minidump error step by step from the display driver to the NVIDIA or AMD graphic settings.
Solutions:
- 1: Update the Graphics Card Driver
- 2: Enable VSync and Triple Buffering in NVIDIA Control Panel
- 3: Uninstall and Reinstall AMD Catalyst Software
- 4: Create Minecraft Dump Files Manually
Solution 1: Update the Graphics Card Driver
The performance of the graphics card on your PC has much to do with the performance of Minecraft. While driver can be an important component of the graphics card, so it is necessary for you to make sure the display driver is up-to-date and compatible with the system.
Driver Booster, here, is recommended to update the NVIDIA, AMD, or Intel driver automatically and quickly. That will quicken your pace to fix the “failed to write core dump” Minecraft issue.
1.Download, install and run Driver Booster.
2. Click Scan.

3. Find out Display adapters and then Update the graphics driver.

Soon, Driver Booster will install the latest driver for your integrated graphics card. After that, you can try to connect to a Minecraft server to see whether “Failed to write core dump. Minidumps are not enabled by default on client versions of Windows” persists.
Of course, you can also navigate to the official website of NVIDIA, or AMD, or Intel to download the graphics driver manually.
Solution 2: Enable VSync and Triple Buffering in NVIDIA Control Panel
In games like Minecraft, VSync (Vertical sync) is a setting that allows gamers to completely lock their frame rate at a specific amount. So it is a useful feature to ensure that frame rate never drops, thus helping gamers avoid disturbance in playing Minecraft.
While Triple Buffer in NVIDIA Control Panel is used to generate a frame in one back buffer so that brings users a higher frame rate. Therefore, you can try to turn these two settings on Java in NVIDIA Control Panel to solve the Minecraft core dump issue.
1. On the desktop, right-click the blank space and then select NVIDIA Control Panel from the list.
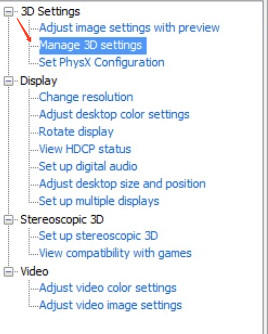
2. Then go to 3D Settings > Manage 3D Settings.
3. On the right pane, locate Program Settings > Add > Browse, and then hit Open.
Here, you need to browse to select the location of the Java.exe file. If you have downloaded Java 7, the location is C:/Program Files/Java/jre7/bin/. While Java 6 is stored in C:/Program Files/Java/jre6/bin/.
4. Return to Program Settings, and then scroll down to find and turn On Vertical Sync and Triple Buffering.
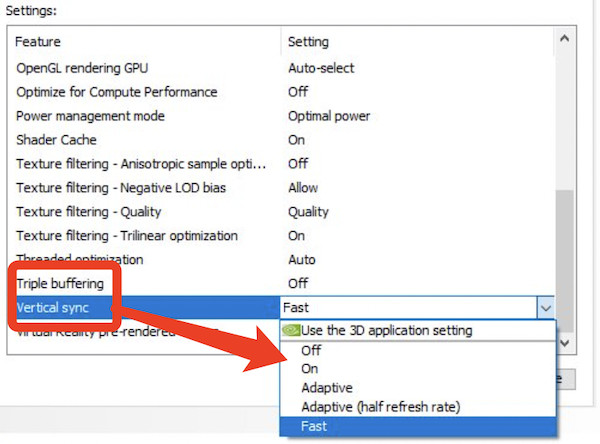
5. Click Apply to take effect.
You can now try to join in or create a server in Minecraft to see whether Minecraft still failed to write core dump.
Solution 3: Uninstall and Reinstall AMD Catalyst Software
The corrupt AMD Catalyst software will lead to Minecraft problems like the “failed to write core dump” error. Therefore, you may as well take time to uninstall the problematic AMD software and then reinstall a new one to get the video game back to work.
1. Open Control Panel.
2. Locate Programs > Uninstall a program. Here, you can View by Categories to quickly access the items you need.
3. In Programs and Features, pinpoint AMD Catalyst utility and right click it to Uninstall.
4. Reboot your device to take effect.
5. Navigate to AMD official website to search for and then download the latest AMD Catalyst software.
With the newly installed AMD Catalyst Control Panel, you can create a Minecraft server as you wish without the “Minidumps are not enabled by default on client versions of Windows”.
Solution 4: Create Minecraft Dump Files Manually
Now that the Minecraft core dumps failed, you may as well try to create these dump files on your own to get the Minecraft to work. You can realize this goal in task manager on Windows 11, 10, 8, and 7.
1. Type task manager in the search box and then press Enter keyboard key to open it.
2. Under Processes, scroll down to locate and right click Minecraft Launcher or Java (TM) Platform SE Binary to Create a dump file.
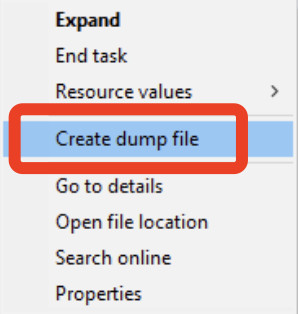
Here, if you are unable to find out Minecraft Launcher or Java (TM) Platform SE Binary, it may imply that you have not started the Minecraft game. Launch Minecraft and then find its process in task manager. After that, Task Manager will automatically create dump files for Minecraft.
Summary:
You can easily solve the “Failed to write core dump. Minidumps are not enabled by default on client versions of Windows” error in Minecraft concerning this tutorial. Just be patient, and then you can create Minecraft servers as you wish.
More Articles:
How to Fix Minecraft Unable to Connect to the World Most Effectively