Wondering how to record gameplay on PS4? Want to capture wonderful moments when playing PS4 games? If you wish to screen capture PS4 gameplay and share the gaming footage with others, this post will be a great help.
In this tutorial, you will figure out how to record PS4 gameplay on PC, on PS4, and with or without a capture card. Moreover, you can get a high-quality PS4 game capture file to share with friends or upload to YouTube with no time limit.
Let’s get right into it!
How to Record Gameplay on PS4 without Capture Card (Up to 60 Mins)
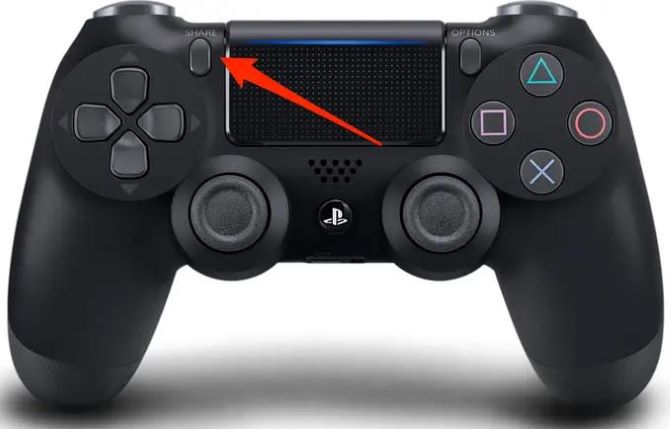
You can record PS4 gameplay without a capture card using its built-in recording feature: the Share button on the controller.
This is the easiest way to record gameplay on PS4, especially for those who are not skillful with computer techniques. It doesn’t require an additional cable or a capture card so anyone can capture the gameplay without hassle.
Generally speaking, you have two choices to record gameplay on PS4 using the Share button: Record the current PS4 gameplay, and Record the past PS4 gameplay.
Let’s walk through both of them.
Note:
The built-in method can only record game clips limited to 60 mins with no webcam. If you want to record your PS4 gameplay with webcam activities, check the next method.
How to record the CURRENT PS4 gameplay (up to 60 minutes)
1. On your PS4, press the Share button on your controller.
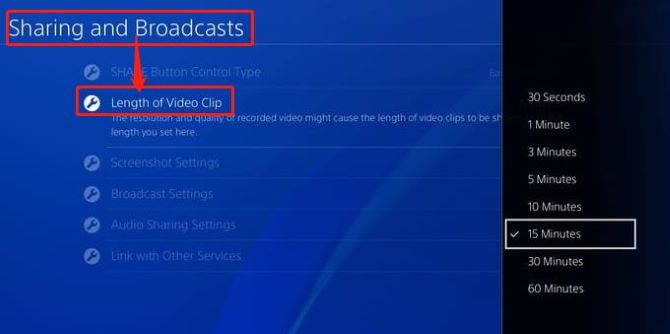
2. Go to Sharing and Broadcast > Length of Video Clip, and choose the length from 30 seconds to 60 minutes.
Tips:
If you want the microphone audio to be recorded, go to Sharing and Broadcast Settings > Audio Sharing Settings. Toggle on to Include Microphone Audio in Video Clips.
3. Play the game that you want to record on PS4. When you’re ready, double-press the Share button to start recording.
4. Similarly, double-press the Share button again to stop recording gameplay on PS4.
How to record a PAST PS4 gameplay (last 15 minutes)
1. Press the Share button once on your PS4 controller.
2. Select Save Video Clip in the Share menu to save the last 15 minutes of your PS4 gameplay.
3. Go back to the home screen, and head to Capture Gallery. Here you can find the recorded video clips.
How to Record Unlimited PS4 Gameplay on PC without Capture Card (Recommended)
Unfortunately, the built-in recording feature on PS4 cannot capture your face since it does not support a webcam. And it is not suitable for people who want to create long gameplay recordings and seek high video quality.
From this point, we recommend recording PS4 gameplay on PC with a professional screen recorder. You can record yourself playing PS4 gameplay as long as you want and without a capture card in this way.
To achieve this, you’ll need to:
#1 Connect the PS4 to PC
#2 Record PS4 Gameplay
We’ll walk you through the detailed steps in the following.
#1 How to Connect PS4 with PC
Remote Play streams your PS4 gameplay from your console to your phone, tablet, laptop, or desktop computer. This means you can start playing your PS4 games on PC with the help of Remote Play.
Here’s how to do it:
1. Download and install PS4 Remote Play for PC, then run it.
2. Set up your PS4 console.
3. Go to Settings > Remote Play Connection Settings, and turn on Enable Remote Play.
4. Next, go to Settings > Account Management, then click Activate as Your Primary PS4.
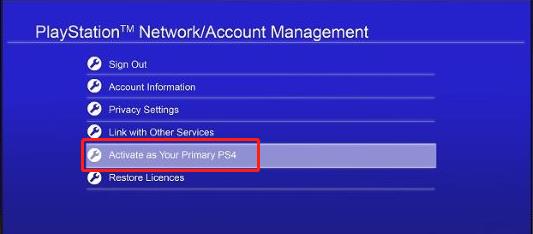
You will only need to do this the first time you use Remote Play.
5. Turn on your PS4 console and use a USB cable to connect your PS4 controller to your Windows PC.
6. Launch Remote Play and sign in with the same account that you use for your PS4 console.
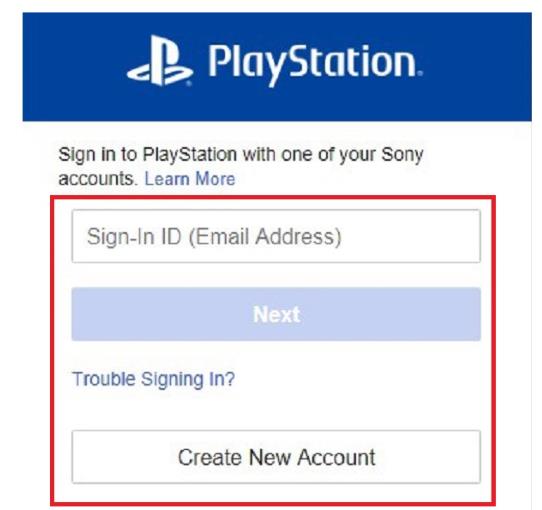
Connect to your PS4 and then your PS4 console will be displayed on your PC.
#2 Record PS4 Gameplay on PC with A Screen Recorder
Once you are all set, it’s important to choose a professional and easy-to-use screen recorder to start recording gameplay on PS4 with your PC. iTop Screen Recorder is highly recommended here.
iTop Screen Recorder can record in 720p, 1080p, and even 4K resolution along with system and microphone audio. This powerful recording tool can also capture a webcam when recording for PS4 gameplay.
You can record with no time limit, take picture-in-picture gameplay tutorials, schedule recordings, and edit and share the recordings with iTop Screen Recorder. Moreover, it allows you to change the default format to MP4, AVI, MOV, FLV, and more.
Key features of iTop Screen Recorder
- Record gameplay videos on PS4 with unlimited recording time
- Record PS4 gameplay in 4K / HD high quality with no lag
- Capture facecam, system sound, and microphone audio together
- Provide video editing features to draw on and apply effects
- Offer plentiful custom options like schedule recording and more
Below are the steps on how to record gameplay on PS4 using iTop Screen Recorder.
Steps to record PS4 gameplay with iTop Screen Recorder
1. Download and install iTop Screen Recorder, then run it on your PC.
2. Select the recording area. You can choose from full, half, or a specific area for recording PS4 gameplay.
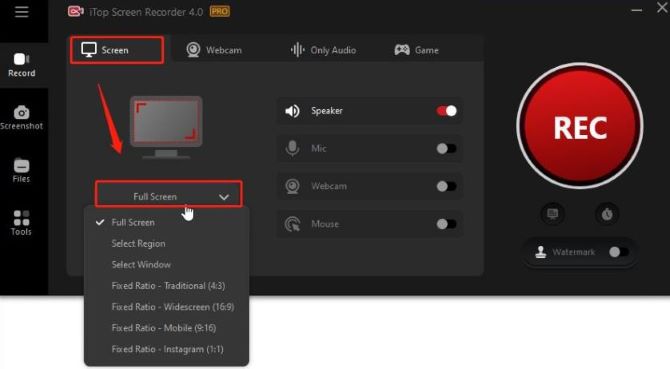
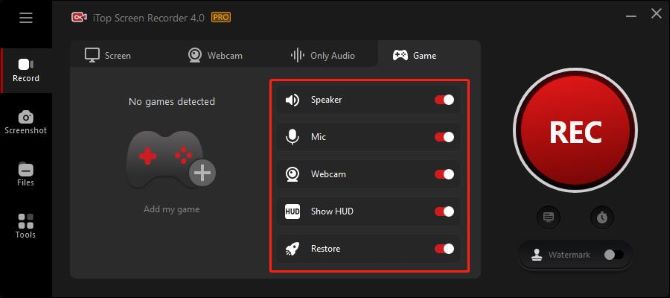
3. Set up recording preferences. Open Speaker, Mic, Mouse, and Webcam to record yourself and audio.
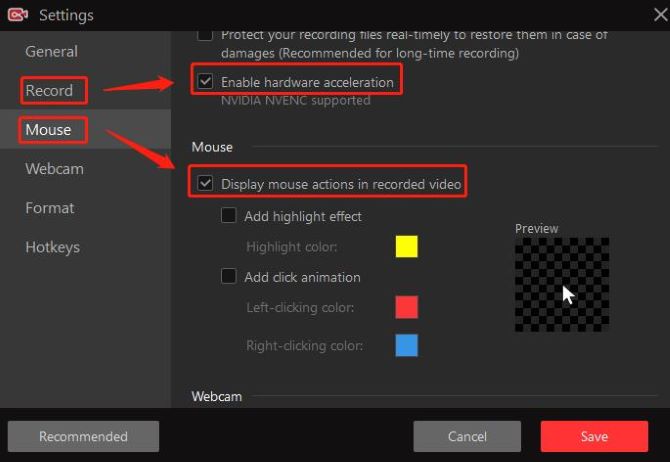
4. Set up record settings. Click on the three horizontal lines at the top left, then click on Settings and scroll down.
- Under Record, select Enable hardware acceleration to screen record PS4 gameplay with no lag.
- Under Mouse, select Display mouse actions and choose add highlight effect or add click animation according to your needs.
- Webcam, toggle on Record webcam overlay, and select the overlay position and overlay size of the webcam.
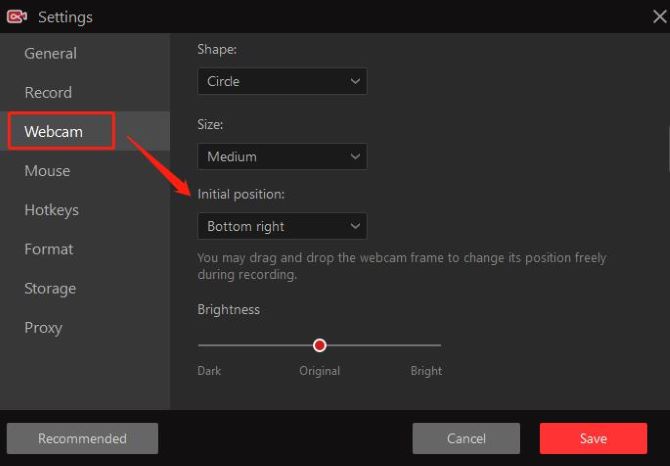
After all, settings are done, click Save.
5. Launch the PS4 gameplay you want to record and start recording. Click the REC button or press the F9 hotkey.
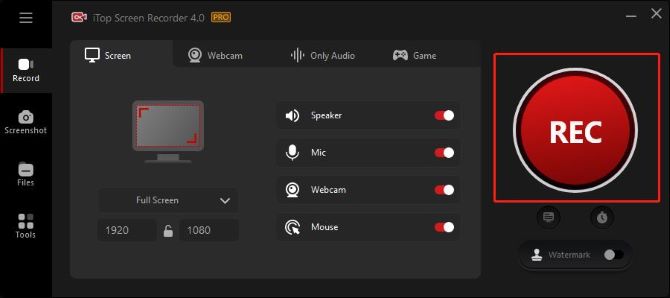
6. Stop recording. Click on the stop button (red square icon) on the floating toolbar anytime. Click on the pause button to temporarily stop recording.

Check your recorded 3DS gameplay. Go to Files > Video and a list of your recorded PS4 gameplay will appear, you can right-click on it to edit, compress and denoise.
All in all, recording PS4 gameplay on PC with iTop Screen Recorder is easy since it has a concise and user-friendly interface, with clear hints about where to click.
How to Record PS4 Gameplay on PC with Capture Card
For a few games, they will disable the recording feature automatically for some reason. For example, Mental Gear Solid V: The Phantom Pain will suspend the capturing process to preserve story spoilers.
In such a situation, investing in a video capture card is the best way out. By employing a solid capture card like Elgato HD60 or 4K60, you can record PS4 gameplay effortlessly. Also, Elgato provides capture software for recording the gameplay.
Here is the complete guide on recording PS4 gameplay on a PC with a capture card.
Preparations for recording with a capture card
- A capture card like Elgato, AVerMedia, etc
- Two HDMI cables
- A USB 3.0 cable
- A screen recorder for PC
- (Optional) An HDCP splitter to capture copyright-protected content
Steps to record gameplay on PC with a capture card
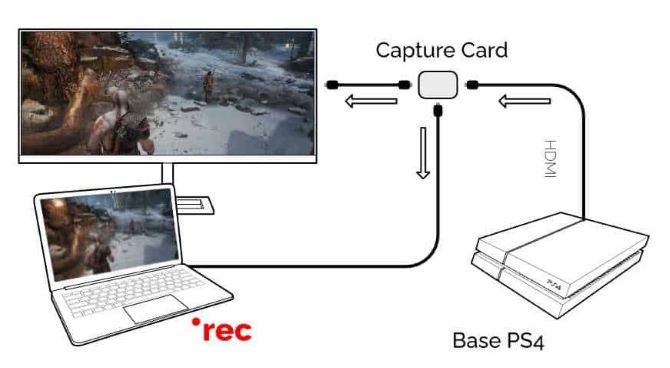
1. Use an HDMI cable to connect your PS4 console to the capture card and use another HDMI cable to connect the PS4 console to your PC.
2. Connect the PC to the capture card using a USB cable. After this, your PS4 should be connected to your PC via a capture card.
3. Disable HDCP on PS4 and ensure your PS4 software is updated.
4. Turn on your PS4 and launch your screen recorder. Start the gameplay and record it on PC with the screen recorder.
Based on the guide above, you should understand how to record gameplay on PS4 with or without a capture card.
For beginners, the built-in gameplay record feature on PS4 is enough. But if you want to record PS4 gameplay on PC or get advanced recording features, you should try iTop Screen Recorder. It is not only easy to use but also able to meet various needs.
We hope our guide is helpful to you.
FAQs About Record Gameplay on PS4
A: Yes. You can record PS4 gameplay with audio by changing a few settings. On your PS4, go to the settings menu and head down to devices then to audio devices, here make sure to adjust and activate all the needed functions such as volume level.
A: PS4 will close the recording automatically when the specified recording length is over. You can click the Share button twice to stop recording at any time. Also, you can press the Share button once and choose the Save Video Clip option to stop recording the past 15 minutes of PS4 gameplay.
A: If you are using the built-in recorder on PS4, the recording length depends on your settings. Press the Share button once, and go to Sharing and Broadcasts > Video Clip Settings > Length of Video Clip. Set the recording time from 30 seconds to 60 minutes. If you want to record gameplay on PS4 without a time limit, the best way is to use a professional screen recorder like iTop Screen Recorder.
A: PS4 will auto-save the gameplay to video. Before that, some settings need to be done. Press the Share button on the controller once, and choose Select Video Clip. You will get the last 15 minutes of a past gameplay clip from PS4 by default.
More Articles:

