As it is known that AutoPlay is a kind of menu that pops up when you plug Hard disk or any other media device accessible to storage space. It will ask what program you would like to choose to display photos, music, and video. And you can customize the autoplay settings by yourself. Though many advantages the AutoPlay possesses, it also has many unknown issues on Windows 10.
You have complained that when you plugged a media device, such as CD/DVD drive and Memory card, the AutoPlay on Windows 10 is not working or some even said that AutoPlay notification is out of work, let alone the AutoPlay.
So if you are the person who has just set the AutoPlay to Ask me every time and the options that Tap to choose what happens with the Removable drive, Memory card or Hard disk are showing in the Action Center for you to choose from. But the AutoPlay remains to be not working on Windows 10, what can you do to fix this AutoPlay issue on Windows 10?
How to Fix AutoPlay Not Working Issue
To effectively let AutoPlay back to work, what measures you need to take is mainly about various AutoPlay settings on Windows 10. Let’s get starting now.
Solutions:
Solution 1: Reset all Defaults for AutoPlay
If you have set the AutoPlay defaults before, maybe you need to reset the AutoPlay settings again to check if it is the faulty AutoPlay settings that result in your AutoPlay not working. And it is possible that you AutoPlay defaults have been accidentally altered.
At the very beginning, make sure you have checked the option Use AutoPlay for all media and devices under AutoPlay in Devices > System, it means if you have not turned on the AutoPlay on Windows 10, it will not work of course.
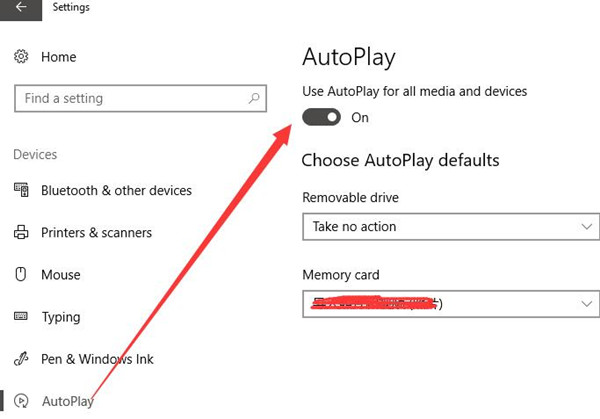
As you have enabled the AutoPlay on Windows 10, but it still stops working on Windows 10. Go along the path to reset settings for AutoPlay:
Control Panel > AutoPlay > Reset all defaults.
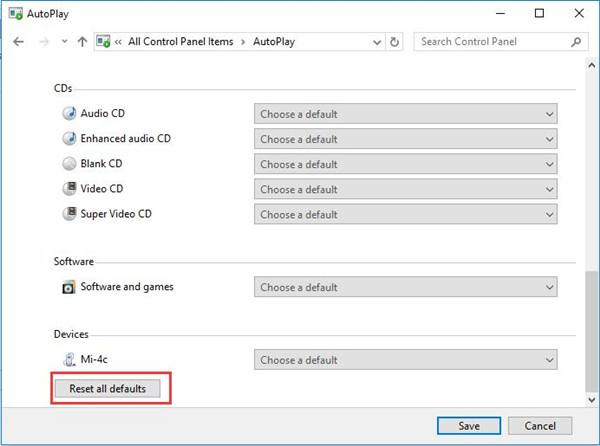
After you have reset all the default settings for AutoPlay on Windows 10, try to insert a CD or a Memory card to see this time your AutoPlay can work properly on Windows 10.
Solution 2: Start Shell Hardware Detection
Shell Hardware Detection is used to manage the AutoPlay on Windows 10, as long as the AutoPlay fails to work well on Windows 10, the Shell Hardware Detection cannot run on Windows 10 as well, vice versa.
Therefore, you would better start the Shell Hardware Detection services and set it as automatic, only in this way can you be able to get your AutoPlay back to normal.
1. Press Win + R to open the Run dialog. And there are 23 shortcuts you must know on Windows 10.
2. Type services.msc in the box and hit Enter to open Service window.
3. Find out Shell Hardware Detection and right click it to Start it.
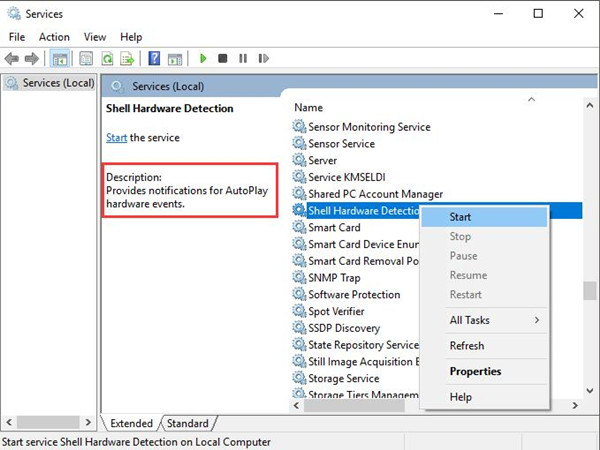
Here you can also see from the Description that the Shell Hardware Detection provides notifications for AutoPlay hardware events.
4. Right click Shell Hardware Detection to navigate to its Properties.
5. In Shell Hardware Detection Properties windows, under the General tab, choose to set the Startup type as Automatic.
This will allow the Shell Hardware Detection to start up automatically as you sign in, and in this way, you are able to receive notification for AutoPlay. In some way, it can also make your AutoPlay work correctly.
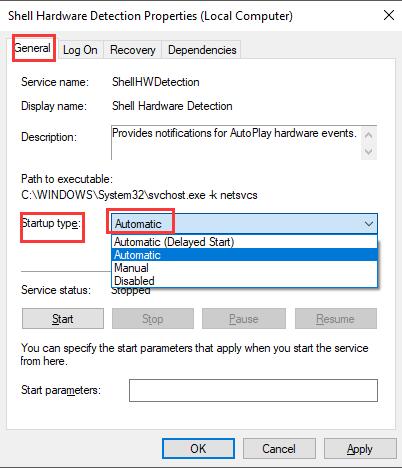
Now AutoPlay on Windows 10 may turn out to work from not working due to your resetting of Shell Hardware Detection.
Solution 3: Modify Registry Editor
The Registry Editor is in charge of Windows settings for the various device, including AutoPlay on Windows 10. If it is the case, you may as well try to modify Registry Editor value to see if it can fix the AutoPlay not working issue on Windows 10.
1. Press Win + R to get to Run. Input regedit and click OK to get into the Service.
2. In the left pane, go along as the path:
HKEY_LOCAL_MACHINE\Software\Microsoft\Windows\CurrentVersion\Policies\Explorer
3. In the right pane, Locate and right click the NoDriveTypeAutoRun to Modify its value.
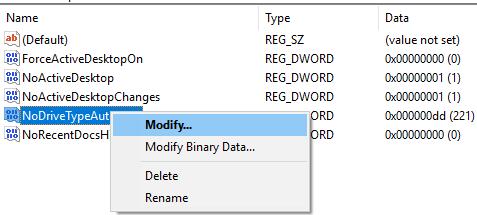
4. Choose the set the Decimal value as 91 and click OK to save the changes.
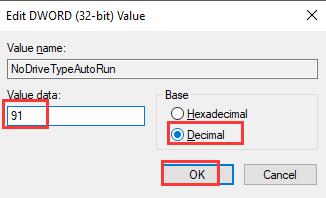
If you have changed the value in HKEY_LOCAL_MACHINE, the AutoPlay can be working now.
Of course, it is feasible that you alter the value of the AutoPlay in Registry Editor in HKEY_CURRENT_USER.
To sum up, as for AutoPlay not working after plugging a media device on Windows 10, the methods above are all you need to try. No matter to reset the defaults for AutoPlay or to change Shell Hardware Detection service or to change registry value for AutoPlay, if necessary, you can use them all to fix this AutoPlay issue on Windows 10.
More Articles:
How to Customize Autoplay Settings on Windows 10?
Tops 3 Ways to Fix Windows Media Player Not Working Windows 10?




thanks the registry fix worked but the key wasn’t there in the first place so I added it as a new key and set it to 91. Whew. funny but I have other machines that work the right way without that registry key in them though?