It is common that some players of Minecraft keep complaining about connection refused error in Minecraft. More often than not, that is due to the problem that Minecraft unable to connect to the server on Windows 10. Hence, for numerous users, they fail to play the video game as usual. In this article, it will show you what causes this Minecraft connection error and how to get rid of it with feasible methods.
Why Does io.netty.channel.abstractchannel$annotatedconnectexception connection refused Minecraft come up?
Sometimes, you may do not know the reasons why the connection refused error comes to you when you manage to connect to the server. In most cases, this issue does not only occur to one server but also many of the servers.
With deep investigations, it has been found that the IP address, outdated software like Java, and the improper Firewall settings are potential culprits of the Minecraft connection issue. For instance, if your IP address is misconfigured or wrongly set, it is likely that Minecraft won’t connect to the server successfully.
How to Fix io.netty.channel.abstractchannel$annotatedconnectexception connection refused: no further information” Error on Minecraft?
As mentioned above, if your Firewall stops Minecraft from accessing the internet or the network error causes the io.netty.channel.abstractchannel$annotatedconnectexception connection timed out error on Windows 10, 8, 7 and Mac. In this way, you can try means to fix errors with the Minecraft when it takes a long time to access the internet.
Solutions:
Solution 1: Allow Minecraft Server Access in Firewall
Sometimes, you may find that Windows Firewall has disabled the access to Minecraft. In this sense, it is undoubted that io.netty.channel.abstractchannel$annotatedconnectexception connection refused: no further information” error appears to you. Hence, there is much need for you to check the settings of your Firewall and then configure it for your video game.
1. Go to Settings > Update & Security.
2. Under Windows Security, choose Firework & network protection.
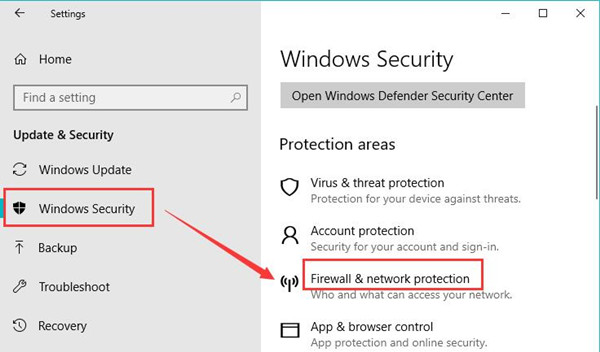
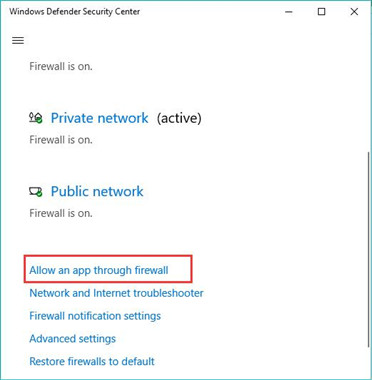
3. Then in Windows Defender Security Center, hit Allow an app through firewall.
4. Then in Allowed apps, click Change settings.
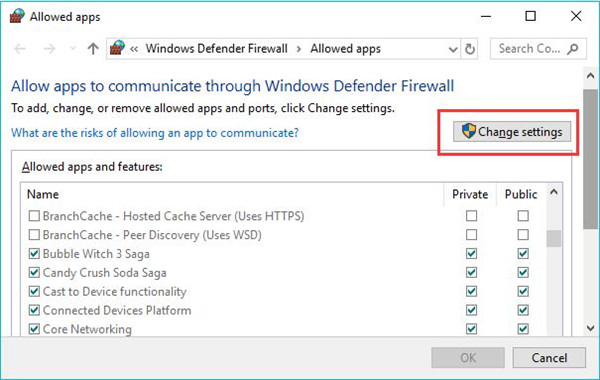
Here you can adjust settings about the allowed and disallowed applications in Windows Firewall.
5. Then Allow another app.
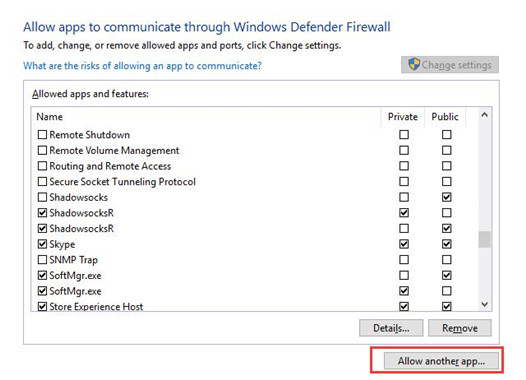
6. In the following window, click Browse.
7. Browse until you find the executable file where your Minecraft file is stored.
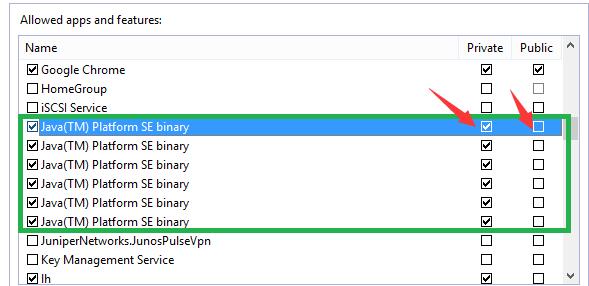
Here you are to find out the “Minecraftserver” file and Java Platform SE Binary file under Java executables.
8. Tick the boxes of the Public and Private to allow these Minecraft server files to access both the Public and Private networks.
9. Try to collect Minecraft to the server to see if the connection refused error will appear again.
For most of you, you will notice that io.netty.channel.Abstractchannel$annotatedconnect
exception connection refused: no further information” error disappeared from Mac and Windows 10, 8, 7.
Related: How to Change Network Type from Public to Private on Windows 10
Solution 2: Reset the Network
To some degree, it is safe to say that this Minecraft connection refused error is a network issue. And almost for every internet problem, resetting the network will be useful since it would reset the changed IP addresses and DNS system to the default ones. Therefore, you may as well try to reset your network. For some people, if you are not using a static IP address, the IP addresses will be configured maliciously by some software.
1. Plug out the power of the WIFI adapter.
2. Wait for 5 minutes and then plug it in.
3. Reconnect the Minecraft to the network server to check if the connection timed out in Minecraft has been solved.
After resetting your network, your error with Minecraft has been fixed and you can now play the game as you wish.
Solution 3: Add IP Addresses
Now that you are encountering io.netty.channel.Abstractchannel$annotatedconnect exception connection refused: no further information” error, it is worth a try to make sure your IP addresses are working for your game on Windows and Mac. Moreover, you can even add the missing IP addresses or ports to the system. Minecraft launcher will go back to run once the internet server is connected.
1. Search Command Prompt in the search box and then right click the search result to Run as administrator.
2. In Command Prompt, type in ipconfig and then memorize the IPv4 address.
3. Go to File Explorer > Minecraft Servers folder >Maxwell > MinecraftServer > Server Properties text document.
4. In the Server Properties text document, find out and note down the Server Port.
Here you need to note down the Server Port.
5. Open the Minecraft game and then choose Play multiplayer.
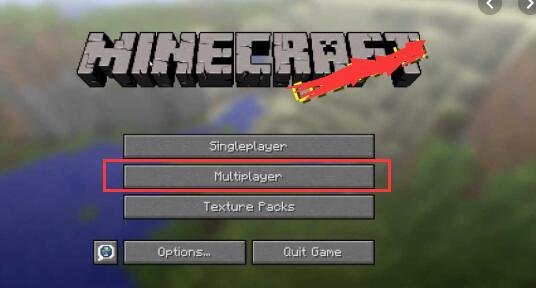
6. In Play Multiplayer, select the server you want to connect to and then hit Edit.
7. Then in Edit Server info, change the Server Address to the IPv4 address and Server port to the one you have noted down before.
8. Hit Done to finish changing the IP address and port.
Now, you will feel free to connect to the Minecraft server and io.netty.channel.Abstractchannel
$annotatedconnect exception connection refused error will vanish.
In a word, you can choose to change the IP address, the server port, or the network settings so as to fix Minecraft connection error that io.netty.channel.Abstractchannel$annotatedconnect exception connection refused: no further information” error efficiently.
More Articles:
Solved: Minecraft OpenGL 1281 Error

