Contents:
Destiny 2 Servers Unavailable Overview
Why Destiny 2 Servers Are Down on My PC?
How to Fix Destiny 2 Server Unavailable Error on Windows 10?
Destiny 2 Servers Unavailable Overview
Suddenly, your Destiny 2 is down and it shows you the error that your PC could not connect to Destiny 2. Please check your network configuration and try again.
Even though you tried again, Destiny just didn’t let you connect to Destiny 2 server. With the unavailable Destiny 2 servers, you can’t play the games. In some cases, after you started it, the Destiny 2 servers disconnect and warn you that Destiny 2 servers are not available, Server maintenances.
In either condition, it is urgent for you to deal with this Destiny 2 server not working error on Windows 10.
Related: Fixed: Could Not Connect to the Steam Network
Why Destiny 2 Servers Are Down on My PC?
For one part, as you know, Destiny 2 servers serve people around the world. So there is a high probability that too many gamers try to connect to the Destiny server at the same time. That leads to Destiny sever status down and not working on PlayStation 4.
For another part, if there is anything wrong with your network, including network driver, network adapter, you will lose the connection to the Destiny 2 servers. Of course, perhaps it does make sense that you are unable to connect to the Destiny 2 PC when the Destiny game developer Bungie is repairing or maintaining the servers.
How to Fix Destiny 2 Server Unavailable Error on Windows 10?
As per what causes Destiny 2 server down, in a large sense, the issue lies in gamers. You need to configure your network connections to make sure the network works fine in games.
You can first check whether the Destiny 2 not working is due to the server maintenances and then restart your game in different frames in case the unavailable Destiny 2 servers come up because of the overloading customers.
All done, if the Destiny 2 servers not connecting persists, now let’s begin to fix this Destiny 2 server error from your side.
Solutions:
1: Turn off DHCP on Windows 10
3: Disable WIFI Network Connection
4: Update Windows 10 Network Driver
5: Enable UPnP for Windows 10 Network
Solution 1: Turn off DHCP on Windows 10
To users’ mind, the Dynamic Host Configuration Protocol (DHCP) can to some extent lead to Destiny 2 servers not connecting to PC.
DHCP is the network management protocol on UDP/IP networks, in this case, a DHCP server is capable of assigning the IP address and other network configuration to your PC.
Although DHCP can facilitate the process of connecting, it is also able to give rise to the unavailable or unsteady network for activities like playing Destiny 2 (Ascendant Challenge This Week). Thus, you now are supposed to disable this DHCP functionality and try to assign IP addresses manually.
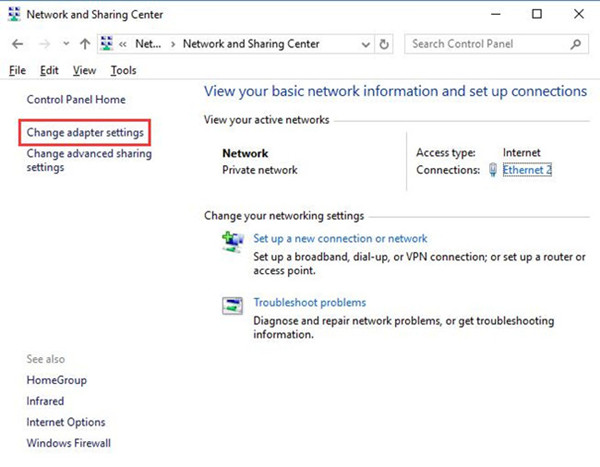
1. Go to Start > Settings > Network & Internet.
2. Under Status, hit Network and Sharing Center.

3. Then choose to Change adapter settings.
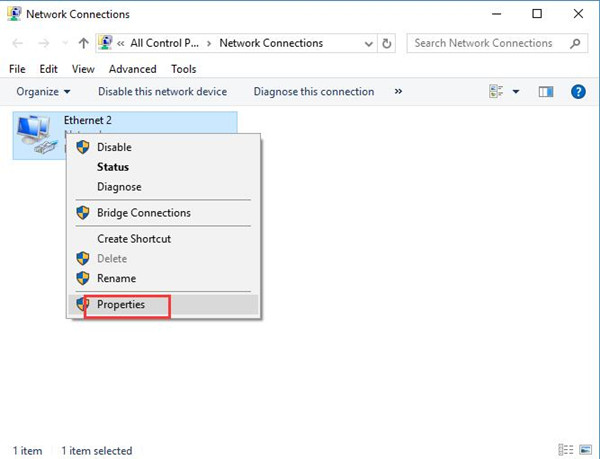
4. Under your Ethernet or WIFI, right click it to open its Properties.
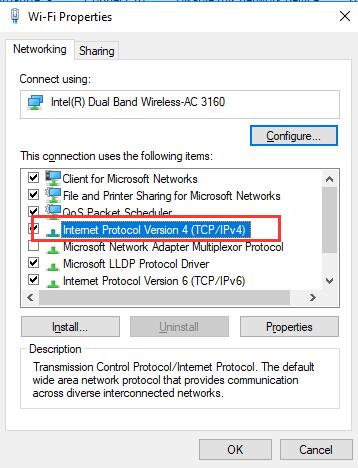
5. Then choose Internet Protocol Version 4 (TCP/IPv4), click the Properties.
6. Then tick the circle of both Use the following IP Address and Use the following DNS server addresses.
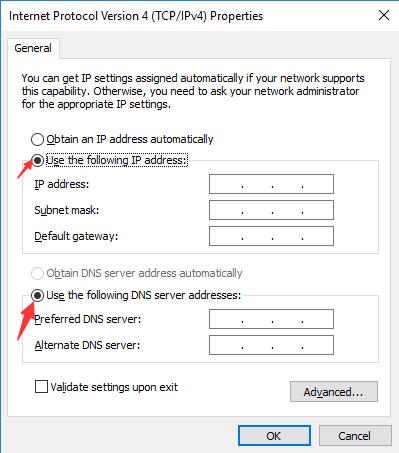
7. After that, enter the IP address and DNS server addresses by yourself.
For your reference, you might as well make DNS server address as 8.8.8.8 or 8.8.4.4.
8. Reboot Windows 10.
Now without the Dynamic Host Configuration Protocol, you may as well re-launch the game and check whether or not the Destiny 2 server connection issue has disappeared. If possible, it is up to you to obtain the IP address automatically with DHCP function on or assign it manually later.
Solution 2: Reset TCP/IP Address
Next, to make sure no network corruption on your Destiny 2 PC, you would better reset the IP address. On that occasion, the Destiny 2 servers would be available for you after the network connection error resolved.
1. Type in Command Prompt in the search box and then right click the best-matched result to Run as administrator.
2. In CMD with administrative privileges, input netsh winsock reset and then press Enter to reset the TCP/IP address.

3. Reboot your PC to take effect.
Possibly, this time when you attempt to connect the Destiny 2 server to PC, no connection available issue will be removed and you can add to Destiny 2 server as you wish.
Related: Ethernet Doesn’t Have a Vaild IP Configuration
Solution 3: Disable WIFI Network Connection
The third local network configuration that may contribute to PC loses connection to Destiny 2 servers is your network type.
It is said that the Ethernet network runs faster and more smoothly than WIFI network. Additionally, WIFI connection will bring computers much more interference. Perhaps that the PS4 Destiny servers not available is caused by the WIFI network error.
If you can use WIFI and Ethernet network and set WIFI as priority, it is suggested that you disable your WIFI and enable the Ethernet connection on Windows 10.
1. Navigate to Start > Settings > Network & Internet > Network and Sharing Center > Change adapter settings.
2. Then locate your WIFI connection and right click it to Disable.
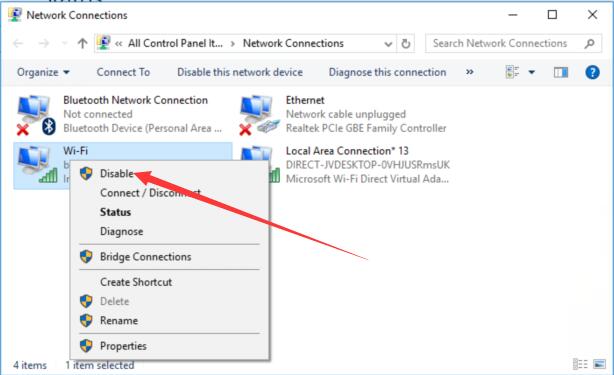
3. Start Destiny 2 and try to connect to Destiny 2 servers.
Here for some people, you will notice that the not working game goes back to normal and you are qualified to use the available Destiny 2 server to play with your companions.
Related: WiFi Keeps Dropping on Windows 10
Solution 4: Update Windows 10 Network Driver
Outdated drivers for the network adapter can also be seen as one of the culprits, especially when you stumble upon Destiny 2 down error right after Windows 10 update.
You would better uninstall your network driver and then reinstall an updated one to fix Destiny connectivity issue. Before uninstalling network driver, you should go to the official site to download the latest version of drivers.
1. Open Device Manager.
2. Expand Network adapters and then right click the network driver to Uninstall device.
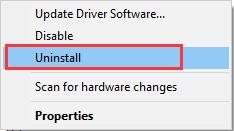
3. Find the network driver package and install it manually.
If you do not have much knowledge with updating network driver yourself, you can use the automatic way to help you.
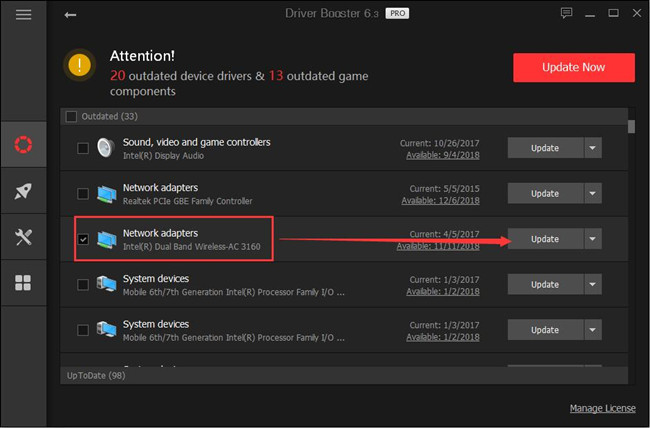
Driver Booster will be the best choice to help you finish this task. As the best driver update software, Driver Booster can download all the missing, outdated drivers at one time, and then update these drivers automatically.
1. Download, install and run Driver Booster on your computer.
2. Click Scan. After that, Driver Booster will scan all your computer devices including the network adapter and wireless adapter, and find the latest drivers for them.

3. Click Update. Find your network adapter and click update to download and update the network driver.
If the network configuration is well-arranged, it is natural that Destiny 2 servers are not available won’t come up and you are entitled to connect to it successfully.
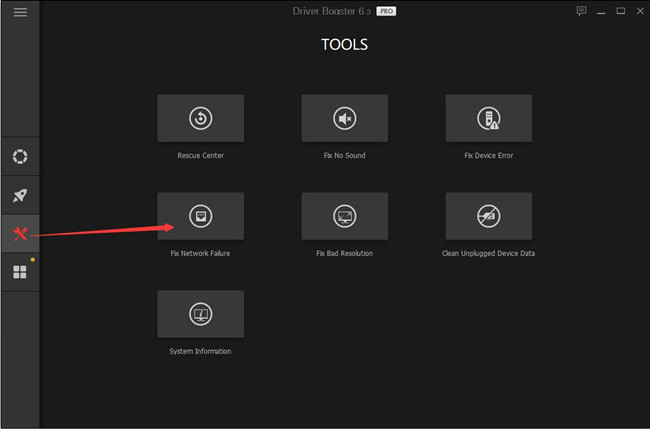
Tips: If your computer has no network connection, you can use the Driver Booster to fix the network issue at first. After opening the Driver Booster, go to the tools icon and choose this icon to fix the network issue.
Solution 5: Enable UPnP for Windows 10 Network
In terms of gamers planning to play Destiny with more than one console, the UPnP (Universal Plug and Play) is required. UPnP enables computers with the same network to discover each other.
Therefore, if you hope to use two or more console when connecting to Destiny 2 servers, you are supposed to turn on the UPnP option for your PC.
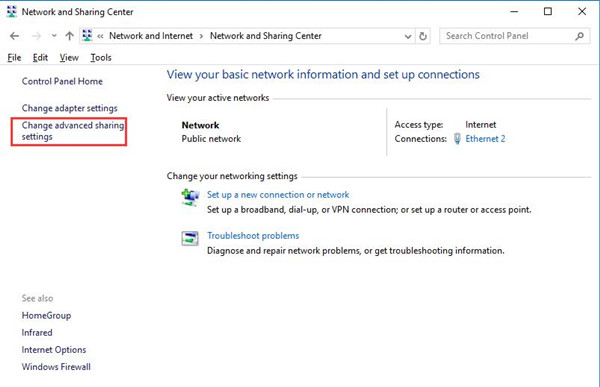
1. Go to Control Panel > Network and Internet > Network and Sharing Center > Change advanced sharing settings.
2. Then under Network discovery, tick the circle of Turn on network discovery and then click Save changes.
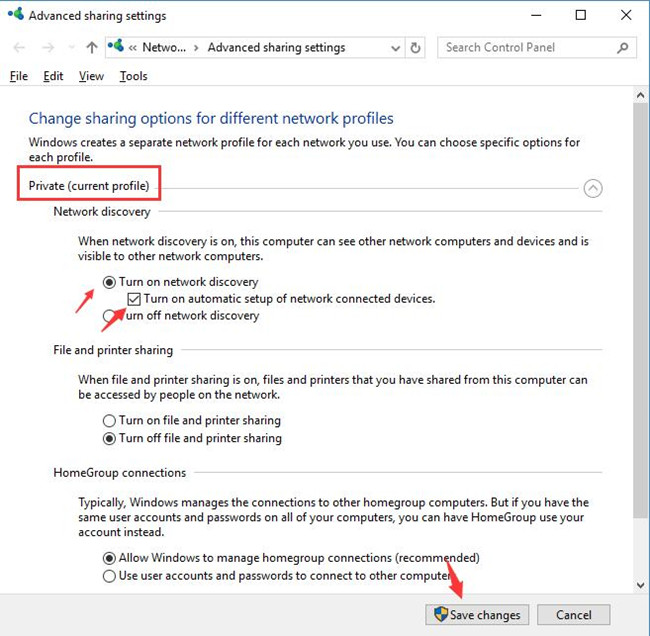
From then on, you are capable of using more consoles playing Destiny 2 without unavailable game servers.
But for the sake of PC security, you should try to turn off the UPnP when not in Destiny 2 characters.
Above are what you can do in your end, but what if Destiny 2 server maintenance is in full swing? Maybe you can only wait until the Destiny game is repaired by the developer.
In summary, at the thought of Destiny 2 servers are not available, you can try to ensure your network adapter, driver and other configuration work well on your PC. Or you have to contact Bungie Destiny.
More Articles:
Steam Error Code 105: Unable to Connect to Server
Fixed: An Unknown Directx Error Has Occurred and League of Legends Cannot Start